What's new
Old Chevelles

Welcome to OldChevelles.com, built by Auto Enthusiasts for Auto Enthusiasts. Cars are not our only interests so please feel free to post about any subject the community might enjoy or you just feel you need to air.

We respect free speech and constructive dialogue however we don't allow threatening talk against members, nudity, or pornography. Threads are monitored and trolls are not tolerated.

This site is completely free and there are no costs. Please enjoy and provide feedback.
  • We've enabled the website app for anyone who wants to use it on a mobile or desktop device.

  • We've changed the header logo to display our Member's Cars.

    If you'd like your car to show up there, go to the forum Site Bugs & Feature Requests and post your image in the "Member's Car Pictures for the Header Logo" and we'll add your car into the lineup.

64 Two-Door Wagon L79/4 speed build

After the car was fully polished, it was time to turn my attention to the trim. This car has 30 pieces combined of aluminum & stainless to restore. Luckily most of it was in excellent shape, but those 6 side moldings alone are about 30 feet in total just by themselves. Ugh.

I did need to buy 3 NOS pieces, the drivers side fender eyebrow, the hood lip molding & the grille. But even they needed to be stripped and polished to match the rest of the pieces.

So this is where it begins, finding little dings & removing them all. Armed with pry tools, punches, screwdrivers, you name it...along with tiny sanding blocks & tons of elbow grease, I used a marker to outline the defects & away I went.

Hood Automotive tire Bumper Set tool Gas


Here's a side by side of a fully polished molding on the right & its companion on the left after ding removal & sanding to 800.

Wood Eyewear Bicycle part Bicycle handlebar Rectangle


Only 28 pieces left to go. 27 I should say. When I bought the car one of the door moldings was worn out in the front from constantly rubbing the fender molding. I found a replacement but it had a nasty ding that I didn't trust myself to remove without destroying the piece. It has all those character lines & concaves, so sent it off to Dennis Barnett to work his magic. Sent me this pic before he polished it. Great guy to deal with if you need trim restored.


Road surface Automotive tire Wood Asphalt Floor


Here's the box for the NOS grille I found...Dated 7/63 :eek: Older than the car which was built in 10/63. I hated to toss that box, but when I was moving it had to go.

Brown Font Wood Paper Paper product


Wood Flooring Floor Hardwood Wood stain


Wood Rectangle Font Material property Parallel


Grille before stripping the anodizing...

Wood Flooring Floor Hardwood Gas
 
Once the trim was all polished, I was ready to work on the tailgate & rear lights.

As soon as I found the car, I had gathered rare NOS parts including this NOS crank base. Might be one of the last to exist on the planet. I've looked for others to have as a spare & can't find anything.

Tin Rectangle Automotive lighting Amber Material property


Original side bumpers. Not reproduced. Luckily the car came with an extra tailgate so I had 6 total to choose from. These were the best 4.

Rectangle Grey Font Electronic device Auto part


Replated tailgate latch...
Automotive tire Watch accessory Jewellery Gadget Font


The tailgate window channels need to be reflocked & have the rubber ends replaced, so I ordered the parts from Einstyn & reassembled them.

The channels were really clean, but I had to scrape out the remnants of the old linings.

Wood Automotive exterior Metal Auto part Hardwood


Once cleaned out, I pop riveted the new rubber ends. If you need them, these pieces aren't an exact fit, but they are not available anywhere else, so I'm extremely grateful for Pete at Einstyn for making them.

Wood Tool Bicycle part Auto part Hardwood


Then I glued the new liners in place...here they are before I trimmed them with a razor.

Wood Rectangle Natural material Hardwood Flooring


Here's the original tail light bezels installed. I was extremely fortunate they were in almost pristine condition without any pitting. All the original lenses were cracked, so I found all new NOS replacements. One inside diffuser lens for the brake lights was still intact, but I wasn't able to locate another one. I came across a '65 version which I then trimmed to fit. Could've sworn I snapped a pic of that, but it's vanished, along with my sanity.

The moisture wick was still in place on the passenger side, but not the drivers side. God only knows what I used to create a new one, but it will do the job for the next 60 years.

Gas Audio equipment Automotive lighting Machine Gadget


Automotive tail & brake light Automotive lighting Fluid Gas Glass


Also restored the original 300 emblems for the quarters. First I polished them, but there was no way to mask the thin inside line or the numbers without losing my mind, so I taped the edges, sprayed the black lightly & then gently scraped the paint of the lines & numbers with my finger nail after each coat. I was amazed they turned out this nice & I'm very lucky the chrome was so clean.

Hood Sleeve Wood Font Motor vehicle
 
Before installing the rear bumper, I had to spray the brackets. When I got the car, the rear bumper was gone, so I found two of the brackets NOS, the other two in my travels, while the center one was still bolted to the frame. Here they are after blasting & paint.


Musical instrument accessory Bicycle part Wood Bicycle saddle Guitar accessory


The original license lamp housings were toast, but the lenses & bezels were in reusable condition after I took them to the buffing wheel. I bought some repop assemblies and used the new housings with my original Guide lenses & bezels. The original lenses are actually glass which shocked me.


Automotive lighting Headlamp Automotive fog light Silver Rim


If you recall, I found the car in Flagstaff, AZ & the owner was an older gentleman in his early 80s who purchased it in 1969, but said he stopped driving it regularly in 1973. While the rear bumper was MIA, the front bumper came with the original 73 AZ plate still attached. I was determined to keep it with the car, but its present condition was unacceptable.

Vehicle registration plate Motor vehicle Rectangle Wood Font


I'm sure most of you can figure out where this is heading. Being the psycho that I am, I had my paint guy match the colors before I stripped it in my sand blaster. Or at least tried to...my media wasn't aggressive enough to remove it all. So I sanded it more by hand to feather edge & epoxy primed over what was left to seal it.

Vehicle registration plate Motor vehicle Bumper Automotive exterior Font


After contemplating how I was going to paint the smaller letters, constantly changing my mind between hand lettering them or masking them & spraying them, I decided on a plan. First I shot the green.


Rectangle Font Automotive exterior Gas Signage


Then I decided to give the fine line tape a chance. 1/4" for the larger numbers, 1/8" for the smaller ones. I spent a few hours each night taping for 3 nights. 😒

Rectangle Purple Gadget Automotive exterior Font


Sprayed the gold...

Motor vehicle Wood Font Artifact Rectangle


Then after it sat overnight, I carefully started unmasking.
Vehicle registration plate Motor vehicle Automotive exterior Wood Font


Just a few areas needed some brush touch up...
Vehicle registration plate Rectangle Font Gas Automotive exterior


After touching it up, here it is installed & you can finally see the finished tailgate as well as the installed bumper...

Car Vehicle registration plate Automotive parking light Automotive tail & brake light Vehicle


Installing those letters should be a simple task one would think, but even though Trim Parts manufactures them in the USA, they don't make the speed nuts that come with them. They started stripping the shafts & spinning while my hands & forearms were contorted in the inner structure of the tailgate. The amount of cursing that ensued would make Sam Kinnison roll over in his grave. It's tiny things like these which should take 30 minutes that wind up taking all afternoon. Takes the enjoyment out of building these cars. I digress...which is why I'm not even going to bother discussing the rear emblem restoration process as I don't want my blood pressure to spike.
 
Here's where the project gets frantic as the cross country move was less than 8 weeks away...

A bunch of parts were blasted ready for paint. Since it was a crazy rush, forgive me If I don't have all the finished photos. Everything will be shown assembled & in place toward the finish

Radiator shroud...original GM that my parts buddy had in his stash


Chair Table Tints and shades Circle Monochrome


Voltage regulator cover


Gas Service Font Metal Health care


Harrison HD radiator back from the radiator shop, pressure tested for leaks and repaired where needed.


Plant Grille Motor vehicle Automotive tire Wood


Steering column disassembled & blasted


Wood Asphalt Road surface Gas Automotive tire


Restored pedal assembly


Wood Sculpture Gas Bicycle part Auto part


Sculpture Statue Art Wood Working animal
 
Really nice Pete. I just love the wagon. Not sure how I could swing it just yet (still big expenditures going on the motorhome), but I'm in awe of that wagon. It speaks to me, and it's just beautiful.
 
Really nice Pete. I just love the wagon. Not sure how I could swing it just yet (still big expenditures going on the motorhome), but I'm in awe of that wagon. It speaks to me, and it's just beautiful.

Thanks for the kind words, Kevin. (y)
 
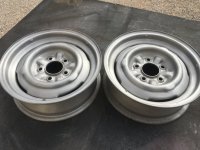
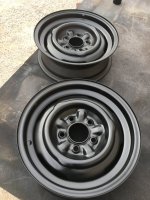
Found 2 15x6 vintage steel wheels & then bought 2 new 15x7s from Summit & needed to prep them for paint.

15x6s freshly blasted, then sanded by hand with 320.

39014845-B040-4D4C-85AC-A0B4632CFA0F.jpeg


Epoxy primed...


A4B401C7-D64E-466A-BF32-7A3247417D86.jpeg


15 x 7s came powder coated so all I needed to do was scuff them down with a grey scotchbrite.

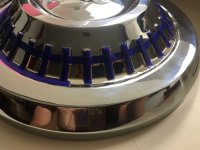
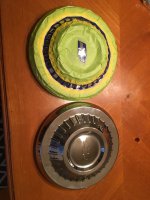
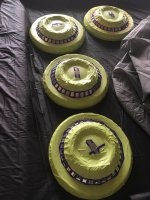
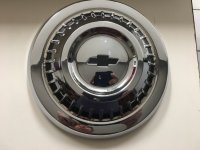
After I dropped them off to the painter, I worked on the dog dish caps. 64-65 shared the same cap, but they are not reproduced & usually mistaken or substituted with '67 caps. That would not work for me so I scouted for the correct caps. Found 2 NOS ones & 2 in restorable condition. Found a chrome plate shop in Austin TX that had a good reputation & reasonable pricing. Some shops quoted me $250 per cap...ouch. Centex plating did them for $65 a cap.

The problem is they don't do the detail painting....or at least I didn't inquire...so time to break out the fine line tape.


9924A991-D8B9-4EF6-A8A4-B34468DFBDD2_1_105_c.jpeg


First one done...

DB80723B-055A-4976-9CDE-C2B00C4F325F_1_105_c.jpeg

All done & ready to spray


34250278-25CD-4CDB-B339-8D944EA04221_1_105_c.jpeg


First one unmasked...


0DFF2FF1-F8F7-4882-9817-4DD2B9C547DF_1_201_a.jpeg


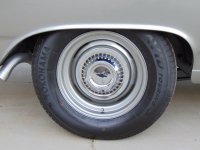
Painted wheels & installed on the car...

7FF4410E-D5C6-4751-9625-0CE22080145A_1_105_c.jpeg


406C8D2C-4EFA-4C7F-9EF7-BB195BF7C0B3_1_105_c.jpeg
 
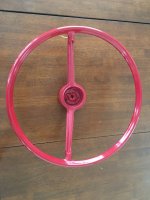
Time to turn my attention to interior. That leads us to the one last project I was completely dreading....repairing the cracks in the steering wheel. I was going to try to find a nicer wheel, but 300 models came with a wheel without the 4 pieces of stainless trim in them. Which meant I might as well fix what I have than trying to find a needle in a haystack and paying through the nose for a clean wheel.

After it was stripped, I began to apply the epoxy to the cracks. Once sanded I had to keep repeating the process until I was satisfied with my results. Here she sits masked & ready for primer.

5A8AF5F8-99DF-4A54-A7FE-67EA6807816A_1_105_c.jpeg

I think it was easier fixing the cracks than it was trying to spray the wheel without leaving dry spots. After about 4 attempts at a perfect semi gloss finish out of the gun, I gave up & broke out the sandpaper. I had to color sand & buff the wheel to mimic the factory sheen My girlfriend, god bless her, was a hero for holding the wheel while I worked the buffer & a 3" pad. The final results speak for themself.

B62286AC-BE8F-4B49-88F6-EEBE2A1C5C1F.jpeg

Just as I received my seat covers & door panels from SMS in Oregon, I was busy transforming all the original parts like kick panels, rear seat mounts, slider window covers, windlace & windlace retainers, etc to red.
Sprayed a test piece to confirm the color. My local paint guy was extremely patient helping me match the sheen & color just right.
Shelving Gas Automotive exterior Wood Machine

Here they are awaiting install
Wood Gesture Font Art Flooring

Here's two of the side window plastic headliner moldings from Trim Parts after they were sprayed red. Wish they also made the piece that wraps around the tailgate window opening, but a generic piece of windlace worked as a substitute.
Sculpture Wood Recreation Metal Art


I was also able to reuse the original windlace that wraps the entire front door openings & sprayed them red, but alas those pics elude me at the moment.
 
Last edited:
Before I could start assembling the interior, I had a few projects that needed to be accomplished. I found a factory gauge cluster in Prescott, AZ along with an El Camino bumper with the brackets still attached. The kid selling them wanted $80 total for everything so my girlfriend & I hopped in the car on St Patty's Day in 2018 while I was still in the parts collecting stage of the project, about a year before I began work on it.

With factory gauges, that meant the dash harness needed to be retrofitted. That harness along with the front-rear ribbon cable were the only reusable wiring in the car. The rest of the wiring was completely trashed. I kept the harnesses for reference & to strip for extra connectors, but they were in sad shape.

Luckily the dash harness was in very nice shape. I had converted my first '67 to factory gauges as well, so the process was a simple one. I also was able to source the two factory connectors I needed along with a replacement connector for the ignition switch to replace the original which had two broken tangs.

Harness wrapped & ready for install. New bulbs were added for all the dash lights.


17a790db-583d-4830-a711-5ccd13f2ed22-jpeg.736851


Next up was the heater controls. The original unit had a broken lever & all the sliders were broken. Plus the housing needed to be painted flat red to match the rest of the dash.


95a26539-086c-4afe-b92c-3f9e43149ff8-jpeg.736852


After...Sprayed red, repaired lever, new sliders, new heater switch & polished buttons.


43ea7faf-3035-4509-9ea6-80a9dcc24c38-jpeg.736853


Now it was time to start installing the interior components, First the kick panel vents, where you can see the painted heater box, new firewall pad which were installed before the body was painted...& the painted & bonded shift hump.


baaecb9f-2a19-4eb2-bb71-7882fca15dfa_1_105_c-jpeg.736856


This side shows the pedals, dimmer switch, fuse box ribbon cable, and the original lower column plastic plate...


de5eda61-9e8d-440b-807e-0972446e8fdc_1_105_c-jpeg.736857


At this point we're in full mad dash mode, so pics are sporadic, but here we can see the interior starting to come together after the dash cluster steering column along with the carpet, kick panel, shifter, bezel & the drivers door panel were installed. The dash was painted the correct factory flat red, PPG code 71360 that was perfectly matched by TCP Global.


1d3c19ff-070a-4afa-9d65-03e515bac60e_1_201_a-jpeg.736858


Here's the passenger side door with the vent window, door glass, polished trim all installed, along with the water shield correctly tucked into the slot, awaiting door panel install. You can also see the new Trim Parts sill plate with the blue wrapper protecting the finish. Note the red color coded lock knob & the clear ferrule. NPD is the only company that I know of which supplies to correct size ferrules. The lock knobs were found in the Ecklers Impala catalog.


3b7647d4-2301-4037-89e8-2266653699d4_1_105_c-jpeg.736859


Before I could install the rear seat, I had to repair the broken seat mount hinges that enable the seat to fold forward. When I bought the car, the rivets were sheared off & stuck in the mounts.

After bead blasting, I had to drive the old rivets out but document the orientation of the rivet direction. Luckily I came across a wagon for sale on Ebay that had clear pics of the arms riveted to the mount. If it was assembled incorrectly, the seat wouldn't be able to fold forward. I found the proper rivets from AMK, & hammered them in.


34af8ef9-2399-42fe-b6a7-fc77dba48b23-jpeg.736860


You can see the painted & assembled mounts in the upper half of this photo next to the door panel.


8cfd4fbc-efff-4752-92e6-4285a70dc526_1_105_c-jpeg.736861
 
I wish I could say I took pics of the slider window install, and all the corresponding interior trim....but I didn't. Time was precious & the slider windows were REALLY uncooperative. After paying to have my original slider window channels restored with new felt liners & the rubber resprayed on the outside, unfortunately the rubber & the felts were way too thick & the windows would not fit in the opening. I had to completely scrape off the newly sprayed rubber coating & remove the new felts for a thinner versions. That did the trick, but the $350 I spent to have them rebuilt was literally money flushed down the drain. I could've spent $40 & done them myself with the felts I found through Summit which I used to reline my door channels. Once again, I digress...

Without further ado, let's cut to the chase & show off the completed interior.

Here you can see the added factory gauges & the reproduction tach.


278d3e1f-57cf-4883-82c1-a318274bb2a0_1_105_c-jpeg.736867


SMS did an unbelievable job on the seat covers & door panels. Worth the wait, but give yourself plenty of lead time if you need a set. I got mine delivered 22 months after placing the order with them.


13f2b959-257a-47c1-a2c6-3d7dc98d4a6d_1_105_c-jpeg.736863


48085062-ea37-432c-b0b3-35bb5d0936d8_1_105_c-jpeg.736864


6af4b016-fc39-4727-869c-2bc7c0c4a3fd_1_105_c-jpeg.736868


The parking brake & accelerator pedals are the originals from the factory, as is the plastic column cover on the firewall. Kick panels, also original, were sprayed to match the door panels.


6fcd22db-4a6c-44d3-8b4b-19209a55a2b3_1_105_c-jpeg.736865


807708d5-f74a-4b0a-a980-9bf63ac820e6_1_105_c-jpeg.736866


b8547164-3287-43b6-a1a0-3a5ee2910b18_1_105_c-jpeg.736869


64 two door wagons are unique from '65 as they feature rear ashtrays & arm rests. SMS precut the hole locations for everything, for both front & rear panels.


05deb6fb-6111-4ff0-82ec-f04415113d5c_1_105_c-jpeg.736870
 
More interior shots...

If you notice the seat back bumpers & the mounts that sit on the wheel humps, a gentleman name Steve Mcilearny created a mold from a set of originals & reproduces them in fiberglass. Luckily I found his info in the facebook wagon group. Another one off part that I'm extremely grateful for. Good orginals are rarer than hens teeth. These fit really nicely & should be more durable than the originals.


Motor vehicle Light Vehicle Hood Automotive design


Vehicle Car Window Hood Automotive lighting


Car Vehicle Motor vehicle Plant Automotive exterior


In '64 & I believe '65, cars with red interiors were supposed to come with white headliners. I didn't think that would look good with a silver car, so I went with a red headliner.

Shade Motor vehicle Lighting Automotive exterior Vehicle door


Car Vehicle Motor vehicle Hood Automotive design


Vehicle Car Hood Motor vehicle Automotive lighting
 
Top Bottom