
I'm new to the group but old to the Chevelles. I bought my first one when I was 18 in 1964. A brand new 300 2dr post. I bought my second one for my wife in 1970, a '64 Super Sport convertible. And now I own my third, a '64 Malibu convertible I bought in 2015. Right now I'm converting the idiot lights to factory gauges and need a little help on connecting the amp and temp gauge. I bought a new OEM temp sending unit and wire connector but not sure to wire it in. The gas and oil is pretty basic. Has anyone done this conversion?? I'm posting a photo of the rear of the gauges and could use some input. Any help would be appreciated.
Old Chevelles
Welcome to OldChevelles.com, built by Auto Enthusiasts for Auto Enthusiasts. Cars are not our only interests so please feel free to post about any subject the community might enjoy or you just feel you need to air.
We respect free speech and constructive dialogue however we don't allow threatening talk against members, nudity, or pornography. Threads are monitored and trolls are not tolerated.
This site is completely free and there are no costs. Please enjoy and provide feedback.You are using an out of date browser. It may not display this or other websites correctly.
You should upgrade or use an alternative browser.
You should upgrade or use an alternative browser.
Thank you for the invite!
- Thread starter my3rd64
- Start date
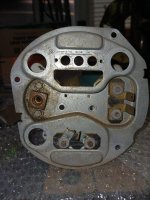

Your gauge likely has 4 wires, an in hot, which connects to your solenoid hot. The output hot connects to your alternator feeding back to the battery. A ground.....and a switched light wire connected to any of your gray wires feeding your gauge lights.
......and welcome aboard.
......and welcome aboard.
Thank you for your reply. Do you know which terminal on the back of the Amp (top/Bottom) is the one that goes to the Alternator?Your gauge likely has 4 wires, an in hot, which connects to your solenoid hot. The output hot connects to your alternator feeding back to the battery. A ground.....and a switched light wire connected to any of your gray wires feeding your gauge lights.
......and welcome aboard.
Does this help at all? Seems to discuss Chevelle and Nova ammeter connection
It's the white wire on the double alternator connector.

This is exactly what I was looking for. Thank youDoes this help at all? Seems to discuss Chevelle and Nova ammeter connection
I took your advise and hooked up a Delco shunt the way you posted it in the diagram. When I go to the shunt from the battery then to the horn relay from the shunt like posted I get nothing. I lose power to the car completely. It seems to need a direct connection to the relay from the battery. I'm at a loss................. I also looked at a 1964 Chevelle wiring diagram and it shows the shunt hooked a different way making this more confusing.Does this help at all? Seems to discuss Chevelle and Nova ammeter connection
Attachments
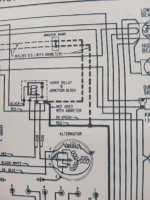
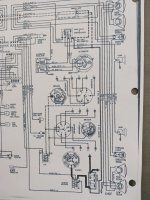
Last edited:

I've always switched the ammeter to a voltage gauge which is much more useful in diagnosing an alternator that isn't charging.
------------
People switch from an ammeter to a voltage gauge for safety, modern electrical compatibility, and simplicity. Key reasons include
eliminating fire hazards from high-current dash wiring, supporting high-output alternators, and easier installation.
Safety and Wiring Limits
Upgraded Electrical Systems
------------
People switch from an ammeter to a voltage gauge for safety, modern electrical compatibility, and simplicity. Key reasons include
eliminating fire hazards from high-current dash wiring, supporting high-output alternators, and easier installation.
Safety and Wiring Limits
- Fire hazard reduction: Ammeters route the entire main power or charging current of the vehicle directly through the dashboard gauge and back. Old or loose connections here can melt or cause fires.
- Parallel safety: Voltmeters wire safely in parallel using small wires with low-amperage circuit protection, meaning no heavy power flows through the gauge cluster.
Upgraded Electrical Systems
- High-output alternators: Modern or upgraded alternators often push 75 to over 100 amps, which easily overloads old factory ammeters.
Thanks for your reply. Yeah, I've been thinking the whole ammeter gauge and may just forget it. I heard they are useless but just wanted to get my dash updated.I've always switched the ammeter to a voltage gauge which is much more useful in diagnosing an alternator that isn't charging.
------------
People switch from an ammeter to a voltage gauge for safety, modern electrical compatibility, and simplicity. Key reasons include
eliminating fire hazards from high-current dash wiring, supporting high-output alternators, and easier installation.
Safety and Wiring Limits
- Fire hazard reduction: Ammeters route the entire main power or charging current of the vehicle directly through the dashboard gauge and back. Old or loose connections here can melt or cause fires.
- Parallel safety: Voltmeters wire safely in parallel using small wires with low-amperage circuit protection, meaning no heavy power flows through the gauge cluster.
Upgraded Electrical Systems
- High-output alternators: Modern or upgraded alternators often push 75 to over 100 amps, which easily overloads old factory ammeters.
A 100 amp alternator is a very popular upgrade and makes an ammeter downright dangerous !Thanks for your reply. Yeah, I've been thinking the whole ammeter gauge and may just forget it. I heard they are useless but just wanted to get my dash updated.

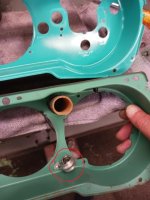
OK, I have all my wiring squared away where I have the ammeter and the temperature gauge working as they should. Now I match up the back of the dash where the gauges, clock and speedo mount and they are different from the Malibu to the Super Sport . The question I have is does anyone know what this bulb goes to on the Super Sport?? The wire is black/blue. The only black/blue I can see on the chart for the '64 goes to the windshield wiper motor. I have no idea what this bulb is for. It also has a little guard protecting it.
Attachments
I spent time trying it again. I unconnected the red wire from the battery to the horn relay and wired it direct to the shunt. Then I connected another wire from the horn relay back to the other side of the shunt. Then I connected the two wires from the gauge to the shunt and everything worked. I turned on the headlights and got a negative reading. I don't know what I did before but it seems like I repeated myself and it worked. Now I'm trying to figure out where that bulb goes.