Old Chevelles
Welcome to OldChevelles.com, built by Auto Enthusiasts for Auto Enthusiasts. Cars are not our only interests so please feel free to post about any subject the community might enjoy or you just feel you need to air.
We respect free speech and constructive dialogue however we don't allow threatening talk against members, nudity, or pornography. Threads are monitored and trolls are not tolerated.
This site is completely free and there are no costs. Please enjoy and provide feedback.You are using an out of date browser. It may not display this or other websites correctly.
You should upgrade or use an alternative browser.
You should upgrade or use an alternative browser.
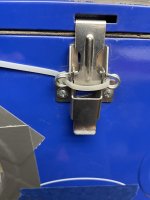
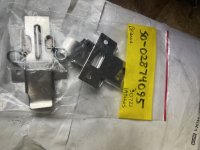
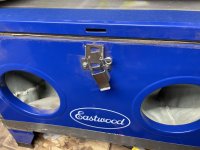
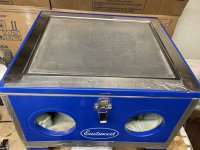
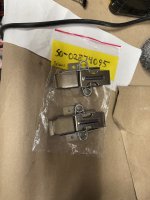
Eastwood latch
- Thread starter 1969chevmalibu1969
- Start date
1969chevmalibu1969
Well-Known Member
I like my blast cabinet. I’ve had and still could modify a few things. I like the gun. I’ve taped and sealed the thing it pushes the glass and the vacuum pulls my hand. They are expensive but I like the quality. Also have their blast tank haven’t used it yet. Gonna do my sway bar soon. Try some of the media from hf that you suggested.
Man, I’d like to hear more blast cabinet talk.
I think I have a very similar bench top cabinet (sold under the name Redline) and my
Latch did the same thing. The parts of the latch are held together by two stiff hairpin looking springs that are just stuck in there but not really held in solidly. Took me 20 minutes to get the latch back together when it fell apart once.
I used caulk when I assembled to lessen leaks. Put foam tape on the top lip so the door seals better.
I bought some cheap plastic sheets to tape on the inside of the window so the glass doesn’t get etched but the you can barely see through the the plastic after a bit.
What I’m not happy with-
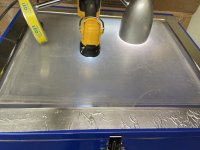
Can’t see shit. I’m using the light it came with
plus a little magnetic LED work light that I wrapped in plastic (so it doesn’t get sand it in).
Inside gets so much dust in the air. I bought a dust collection device (kind of the the dust deputy but shorter and snail shell shaped) to help save my shop vac if I try to vacuum the air. Do you still use the cone shaped air filter inside the cabinet to pre filter or no pre filter?
I’m probably not using the driest air so the gun clogs sometimes. Gotta hold your hand over the nozzle and pull the trigger to clear it.
Gonna try one of those tennis ball sized filters you use on a spray gun and see if it helps.
Fortunately our air is pretty dry here so moisture isn’t a huge problem.
I’ve got a bunch of brackets and stuff to do pretty soon and want to get this thing working better so it’s not so frustrating.
I think I have a very similar bench top cabinet (sold under the name Redline) and my
Latch did the same thing. The parts of the latch are held together by two stiff hairpin looking springs that are just stuck in there but not really held in solidly. Took me 20 minutes to get the latch back together when it fell apart once.
I used caulk when I assembled to lessen leaks. Put foam tape on the top lip so the door seals better.
I bought some cheap plastic sheets to tape on the inside of the window so the glass doesn’t get etched but the you can barely see through the the plastic after a bit.
What I’m not happy with-
Can’t see shit. I’m using the light it came with
plus a little magnetic LED work light that I wrapped in plastic (so it doesn’t get sand it in).
Inside gets so much dust in the air. I bought a dust collection device (kind of the the dust deputy but shorter and snail shell shaped) to help save my shop vac if I try to vacuum the air. Do you still use the cone shaped air filter inside the cabinet to pre filter or no pre filter?
I’m probably not using the driest air so the gun clogs sometimes. Gotta hold your hand over the nozzle and pull the trigger to clear it.
Gonna try one of those tennis ball sized filters you use on a spray gun and see if it helps.
Fortunately our air is pretty dry here so moisture isn’t a huge problem.
I’ve got a bunch of brackets and stuff to do pretty soon and want to get this thing working better so it’s not so frustrating.
kmakar
Janitor
I bought the cheap HF bench cabinet, but did some upgrades on it. The HF benchtop doesn't come with a light, so that sucked from the beginning, but I bought this LED light and WOW, what a monster difference that made.
Next, the cabinet came with a piece for glass and plastic stuck to it to protect the glass view window. Next upgrade was going to Lowes and I had some glass cut the same size as the view glass and put the cheap lowes glass facing inside the tank, and that made another big difference. It cost me $20 for 2 pieces cut (one to use, and a spare).
Next was a vacuum. I had a crappy old 2 HP little vac used for cleaning out the cars, so I bought a new one for cleaning out the cars, then repurposed the old one to reduce the dust fog on the cabinet. I have 1 air inlet at the top that's hooded (prevent the media and dust from escaping) and in the opposite end some fittings to make the shop vac fit tight to the cabinet. That was another game changer.
Lastly and most likely some of your problem, about a year ago I spend some coin on reoutfitting my compressor to dry the air. Cost me in the neighborhood of $400 to buy filters (4 of them) and oil coolers behind the compressor head to cool the air before it went in the tank. Having dry air is paramount for blasting and I can tell you first hand, none of the media has ever gummed up on me, but I guess you have to weigh the cost to the results. I use that compressed air for everything and I've seen my air tools fail because of moist air, so in the long run for myself, it was a no branier.
I think dust control will be my biggest need. I know people do the shop vac with Dust Deputy thing but it’s not clear to me if they run any kind of filter in the cabinet or does the vac simply suction unfiltered air from the cabinet?
Mine has a little cone style pleated filter on the inside that has a thin foam prefilter on it. In my brief testing of this system with the vac attached it seemed like the cone filter got so packed with dust that very little air was moving.
Mine has a little cone style pleated filter on the inside that has a thin foam prefilter on it. In my brief testing of this system with the vac attached it seemed like the cone filter got so packed with dust that very little air was moving.
kmakar
Janitor
I think dust control will be my biggest need. I know people do the shop vac with Dust Deputy thing but it’s not clear to me if they run any kind of filter in the cabinet or does the vac simply suction unfiltered air from the cabinet?
Mine has a little cone style pleated filter on the inside that has a thin foam prefilter on it. In my brief testing of this system with the vac attached it seemed like the cone filter got so packed with dust that very little air was moving.
Do you have a return vent to allow makeup air? Next, no filter on the cabinet itself as the dust clogs it almost immediately. I don't use the dust deputy, I just have a long hose to the shop vac with a filter in the shop vac, but what I did do inside the shop vac was have a deflector so the dust going into the vac doesn't hit the filter and creates a "tornado" vortex inside and prevents the dust from hitting the filter as soon as it enters.
1969chevmalibu1969
Well-Known Member
Sounds exactly like mine. I spent probably as much time as you did trying to put the old one back together plus finding the rest of the pieces. I decided to just call. They were very helpful. Actually I got two. When I was putting mine together I caulked and taped all the corners. I found air leak in glass so I taped that leaving enough room to peek through the clear spot between the shield. Yes the light inside suck and I end up putting other lights on top. I had a nice light but I brake the charging cord , so now I get to find a new one. I have one air filter off the compressor and haven’t had a moisture issue yet. 3/8 25’ foot hose. My only regulator is on the compressor set at 180psi. I find when it is around 90-100 it blast nice. Got mine for small parts, bolts ect.. I do wish I got the next step bench top but so was the price. In the first picture my vac is on and gloves straight out. As you knowMan, I’d like to hear more blast cabinet talk.
I think I have a very similar bench top cabinet (sold under the name Redline) and my
Latch did the same thing. The parts of the latch are held together by two stiff hairpin looking springs that are just stuck in there but not really held in solidly. Took me 20 minutes to get the latch back together when it fell apart once.
I used caulk when I assembled to lessen leaks. Put foam tape on the top lip so the door seals better.
I bought some cheap plastic sheets to tape on the inside of the window so the glass doesn’t get etched but the you can barely see through the the plastic after a bit.
What I’m not happy with-
Can’t see shit. I’m using the light it came with
plus a little magnetic LED work light that I wrapped in plastic (so it doesn’t get sand it in).
Inside gets so much dust in the air. I bought a dust collection device (kind of the the dust deputy but shorter and snail shell shaped) to help save my shop vac if I try to vacuum the air. Do you still use the cone shaped air filter inside the cabinet to pre filter or no pre filter?
I’m probably not using the driest air so the gun clogs sometimes. Gotta hold your hand over the nozzle and pull the trigger to clear it.
Gonna try one of those tennis ball sized filters you use on a spray gun and see if it helps.
Fortunately our air is pretty dry here so moisture isn’t a huge problem.
I’ve got a bunch of brackets and stuff to do pretty soon and want to get this thing working better so it’s not so frustrating.
Attachments
-
 F6B1CE5C-F275-41D8-8A1E-6E809AB79CC2.jpeg92.2 KB · Views: 4
 -
 B31F3782-38E7-4315-8BF2-50D9930E5725.jpeg146.4 KB · Views: 4
 -
 6FA4D933-E8C0-44BB-BBE1-D80CD080F659.jpeg157.6 KB · Views: 4
 -
 D67B5200-6BE2-4122-A6F6-4048395A4A08.jpeg126.3 KB · Views: 3
 -
 77F32A0C-AA4F-4E47-8107-F1800FE58C76.jpeg120.9 KB · Views: 3
 -
 E4D077EA-07BA-4C42-9A53-8B26B304D91A.jpeg126.3 KB · Views: 3
 -
 3A0037BE-8A39-4061-8124-C336C73A431F.jpeg157.6 KB · Views: 3
 -
 643B8AF9-C33E-42D5-BA36-B33661D29E72.jpeg120.9 KB · Views: 4
1969chevmalibu1969
Well-Known Member
I may have to do a few of your upgrades. ThanksI bought the cheap HF bench cabinet, but did some upgrades on it. The HF benchtop doesn't come with a light, so that sucked from the beginning, but I bought this LED light and WOW, what a monster difference that made.
Next, the cabinet came with a piece for glass and plastic stuck to it to protect the glass view window. Next upgrade was going to Lowes and I had some glass cut the same size as the view glass and put the cheap lowes glass facing inside the tank, and that made another big difference. It cost me $20 for 2 pieces cut (one to use, and a spare).
Next was a vacuum. I had a crappy old 2 HP little vac used for cleaning out the cars, so I bought a new one for cleaning out the cars, then repurposed the old one to reduce the dust fog on the cabinet. I have 1 air inlet at the top that's hooded (prevent the media and dust from escaping) and in the opposite end some fittings to make the shop vac fit tight to the cabinet. That was another game changer.
Lastly and most likely some of your problem, about a year ago I spend some coin on reoutfitting my compressor to dry the air. Cost me in the neighborhood of $400 to buy filters (4 of them) and oil coolers behind the compressor head to cool the air before it went in the tank. Having dry air is paramount for blasting and I can tell you first hand, none of the media has ever gummed up on me, but I guess you have to weigh the cost to the results. I use that compressed air for everything and I've seen my air tools fail because of moist air, so in the long run for myself, it was a no branier.


This is the dust collector I bought. Mounts on a bucket. The alternative is the Dust Deputy. I chose this version because it’s lower profile and I hope less cumbersome to store in the garage.
I think HF might have a version of the DD too under their Bauer brand.
To save their shop vacs, alternatively I’ve seen people rig up a system with a 5 gallon bucket. Use pvc tube to bring the dirty air to the bottom of the bucket and put some water in the bucket (just below the pvc tube) to help trap the dust. I would think that if you had a pretty good vacuum in the bucket and the dirty air was sent to the bottom of the bucket, below the water level, the dirty air would bubble through the water helping to trap more dust. I haven’t tested that, it’s just my theory.
Attachments

Here’s the Harbor Freight cyclone

 www.harborfreight.com
Here’s the DIY version

 toolguyd.com
Cyclone Dust Separator Kit for 5 Gallon Buckets
Amazing deals on this Cyclone Dust Separator at Harbor Freight. Quality tools & low prices.
www.harborfreight.com
Here’s the DIY version
Shop Tip: 5 Gallon Bucket DIY Fine Dust Collection Trap
Goodfellow posted an excellent how-to over at the ShopNGarage forum showing how to build a dust collection separator and water trap using a 5 gallon bucket and a few PVC pipes and fittings.