What's new
Old Chevelles

Welcome to OldChevelles.com, built by Auto Enthusiasts for Auto Enthusiasts. Cars are not our only interests so please feel free to post about any subject the community might enjoy or you just feel you need to air.

We respect free speech and constructive dialogue however we don't allow threatening talk against members, nudity, or pornography. Threads are monitored and trolls are not tolerated.

This site is completely free and there are no costs. Please enjoy and provide feedback.
  • We've enabled the website app for anyone who wants to use it on a mobile or desktop device.

  • We've changed the header logo to display our Member's Cars.

    If you'd like your car to show up there, go to the forum Site Bugs & Feature Requests and post your image in the "Member's Car Pictures for the Header Logo" and we'll add your car into the lineup.

Muncie M-20 Questions: How to install speedo and reverse gears on the Extension Casing?

L78fanatic

Well-Known Member
Senior Member
Does anyone on here have any knowledge of Muncie Transmissions? I recently bought a rebuilt M-20 from an engine builder/machine shop owner that I know back in Indiana and he sold me a rebuilt transmission (1967 M-20) that I plan to use in my '67 auto to 4-speed swap this coming Spring. Well, he had the early style casing extension on the back of the trans with the speedo gear connection on the driver side instead of the passenger side like the 1967 M-20 "should have". I mentioned this to him and he quickly sent me the correct casing extension with the spedo gear hookup for the passenger side. It is the proper part number as well. I know there are a few tricks to positioning the reverse gear and the speedo gear when reassembling the casing onto the back of the transmission main body, before bolting it up, but I am not sure of the procedure. He said he would walk me through it, and I know he will but I thought I'd ask on here for some advice/help.

Anyone?

Thanks! I want to do this only once! Ha! I know I can do this! :)

John
 
That helps for sure...I wonder where they got the gasket for the assembly? The guy who rebuilt mine said a gasket isn't necesary...just use any good gasket sealer is all that is needed. The explanation of the reverse gear was very helpful. I like the idea of mounting the trans on an engine stand also! I think I'll do that!.
 
Getting ready to tackle this...the seller said he'd walk me though exchanging the extension housings. I now have the correct '67 housing with the speedo gear on the pass side. I understand the trick is getting the reverse gear positioned properly when attaching the housing. Any advice on this procedure is welcome as it scares me a little bit! :-( Btw, Youtube definitely helps too!
 
Sorry I just found this thread. I've rebuilt several Muncie's & they are really easy to work on once you get past the trepidation of cracking one open.

Paul Cangiolosi's book is very helpful. He also has some great videos on his website. Or Gearboxvideo on youtube.

If you haven't tackled this yet, one thing you want to make sure is to not separate the midplate from the main body when removing the tail shaft. You'll run the risk of the input shaft bearings being displaced which would basically mean removing the main cluster to get it back together correctly. Also don't mess with the detent ball on the reverse selector shaft. That ball is a giant PITA to get back in place if you dislodge it.

Do yourself a favor & use the steel speedo gear ring. It's a press fit or you can use a propane torch to expand it over the shaft, but it will last forever as opposed to the plastic ones that came in some Muncies.

Let me know if you need more info.

I haven't done the switch yet...the builder says he will walk me through the switch while on the phone when I'm ready to tackle it. I have the Muncie rebuild book...very helpful. Supposedly, if I position the tranny vertical with the extension tail casing pointing "upwards" it should be fairly easy for me to do the switch and position the reverse fitting properly. I was wondering about the detent ball....not sure where that is located. Thanks for the input. Do you agree with using Permatex of The Right Stuff to seal the housing back on to the mid-plate? I understand there's no gasket needed.
 
I haven't done the switch yet...the builder says he will walk me through the switch while on the phone when I'm ready to tackle it. I have the Muncie rebuild book...very helpful. Supposedly, if I position the tranny vertical with the extension tail casing pointing "upwards" it should be fairly easy for me to do the switch and position the reverse fitting properly. I was wondering about the detent ball....not sure where that is located. Thanks for the input. Do you agree with using Permatex of The Right Stuff to seal the housing back on to the mid-plate? I understand there's no gasket needed.

NO! Do not use any gasket maker or RTV. There should be a gasket there....not sure where you heard there isn't one. You'll need to buy a gasket set. When I build Muncies, I don't use any RTV/Right Stuff, etc. They didn't have any of that stuff when they were built by GM, either. If the builder of this trans is reputable, he should know not to use any sealant as well. I hope for your sake, the rest of this trans isn't sealed up with goop. That's a recipe for leaks down the road.

Yes, you should set up the trans with the tailshaft pointing skyward. If you have the bell housing out, you can use it as a stand & loosely bolt the trans to it for stability.

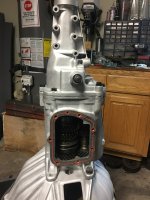
This is the M-20 build that went into my wagon...The detent ball is located right behind the reverse selector shaft on the inside.

The redline gaskets have a raised bead of sealant imprinted on them & they are exclusively sold by Paul C. I have it held in place with a few dabs of anerobic sealant.

C6F67BBD-9690-4B56-A432-B1FD7A44131D_1_105_c.jpeg

Here the link to the set...


Also...now's a VERY good time to inspect your tailshaft bushing. If it looks the slightest bit suspect, don't hesitate, just replace it. You'll hate yourself if you have a vibration in your driveshaft & the bushing turns out to be the culprit.
 
Last edited:
Good food for thought Pete! Thank you! I need to look things over closely and I'll report back to you. I'm in no hurry, but I do want to return the wrong tail housing to the builder. I'm a long way off from putting the transmission into my Chevelle! I'm a bit worried about the amount of effort that will be, swapping from the automatic.. I'm sure there are a few differences in the support brackets and cross the cross member support...oh well. I'll learn as I go. Using the bell housing is a FANTASTIC idea....I have two of those lying around. What a great idea!
 
Good food for thought Pete! Thank you! I need to look things over closely and I'll report back to you. I'm in no hurry, but I do want to return the wrong tail housing to the builder. I'm a long way off from putting the transmission into my Chevelle! I'm a bit worried about the amount of effort that will be, swapping from the automatic.. I'm sure there are a few differences in the support brackets and cross the cross member support...oh well. I'll learn as I go. Using the bell housing is a FANTASTIC idea....I have two of those lying around. What a great idea!
Crossmember is the same for auto's & manuals for all 64-67 Chevelles. The biggest issue with the swap is the aftermarket parts like the z-bar & the upper pushrod. Unless they've improved the repops, which I highly doubt, you might have clearance issues. You'll also need to either find yourself a steering column support with the clutch rod hole pre punched, or cut a hole in your existing bracket. You'll also need to weld the z-bar bracket to the frame in the correct spot so you don't alter the geometry of the linkage.

Are you doing this swap on a lift? This is no fun lying on your back. Those days are over for me.

Good news about the cross-member! I'm no welder so when the time comes I'll be needing some help, plus when I cut the hole in the floor, etc. I have a lift so that's not an issue...the issue is ME...getting too old for these projects! Ha! But, "where there's a will there's a way", as my Mom used to say.... right? I'm ready for Spring already! I really appreciate your advice. I was wondering about the z-bar, and welding the support bracket for the z-bar. This project will bring back memories of when I was a teenager before I had my driving license in Fla (I had my learner's permit at 14) when I swapped my 235 6-banger for a new 327 V8 in my '55 Chevy. I ended up using a 265 V8 bell housing from a '55 V8 so I could use the engine mounts that were on the '55's frame that attached to the bell housing instead of the engine (like required for the 327). The starter for a 265 was smaller so it didn't work as well and when the engine was warm from driving I had to let the engine cool down to be able to start it. The 327 was great though, along with the floor shift I installed in the floor (from the stock 3 on the tree setup). I'm not afraid to tackle things, but well I'm older and a bit feeble, so we'll see how it goes. I'm collecting parts right now, and working on the '67 just enjoying it for awhile....I haven't even driven it yet (I need to register it first and get a PA Title). That's my Winter project, plus working on the Muncie 4-speed. (y)
 
Here's a decent pic of the z-bar and the welded bracket

1621651800169-png.712331
 
Thanks! Yup, that's the pic I saw on the Ground Up Website Articles Section. I suppose the engine should be in place "before" welding that z-bar bracket to the frame to line things up too.
 
Last edited:
Thanks! Yup, that's the pic I saw on the Ground Up Websire Articles Section. I suppose the engine should be in place "before" welding that z-bar bracket to the frame to line things up too.
Yes, you need to align the z-bar with the pivot ball in the block, then loosely bolt it to the frame bracket so you can mark its location to weld it in place. It will basically locate itself as it's contoured to the curve of the frame. Just use a magnet or a c-clamp to hold it until you tack it.

Another thing you'll need to weld is the return bracket for the upper spring of the z-bar return as shown in Beth's photo. There's not a lot of room in that spot with the body on the frame, so this is what I did on my first '67. Mark the outline of its location with an awl & then figure out a way to imprint marks in the firewall that you can see from the inside of the car under the pedals. From the inside of the car, drill out two 3/8" holes & plug weld the bracket, using a strong magnet or an assistant to hold it in place on the other side. The issue with this is your car probably has a full complete interior....but you'll probably be removing the seats & carpet to cut the hole in the floor & add the correct shift hump, so this would be the time to weld that little return bracket.
 
Top Bottom