Old Chevelles
Welcome to OldChevelles.com, built by Auto Enthusiasts for Auto Enthusiasts. Cars are not our only interests so please feel free to post about any subject the community might enjoy or you just feel you need to air.
We respect free speech and constructive dialogue however we don't allow threatening talk against members, nudity, or pornography. Threads are monitored and trolls are not tolerated.
This site is completely free and there are no costs. Please enjoy and provide feedback.You are using an out of date browser. It may not display this or other websites correctly.
You should upgrade or use an alternative browser.
You should upgrade or use an alternative browser.
Moving seat mounts back
- Thread starter MMorgan62
- Start date
kmakar
Janitor
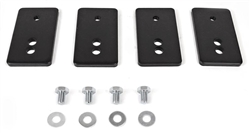
1964 - 1972 Chevelle Front Seat Extenders, 1-1/2 Inches to 2 Inches Additional Room
Need a little more leg room in your Chevelle? Here's the answer, front bucket seat extenders. These handy seat brackets are designed to move your seat back 1 1/2 to 2 inches. Fits all 64, 65, 66, 67, 68, 69, 70, 71, and 72 A-Body cars.
www.musclecarcentral.com
I think you'll find it'd be pretty easy to make them yourself just by looking at the pics.
Your seatbelts are your primary restraint, the seats are a factor, but not designed to hold you in place. I'd think if you're moving it back 2 inches, 3/16 would be enough thread to secure your bolts. So, you're only raising the seat that amount.
Here are instructions on how to accomplish this without buying a kit :

 www.chevelles.com
From 64Tempestwagon @ Team Chevelle
First detach the two tracks from the seat. Remove the side covers as well. The rear portion of the seat frame in front of the rear preexisting
holes dives down about a 1/3 inch. I put the track onto the seat frame there and drilled a hole in the seat frame there (feel the metal there it's 2 layers thick).
I used a grade 8 bolt, lock washer, and nut there. It moved the seat frame forward about 2 inches.

Then I saw where the front of the seat track needed holes in the front over the preexisting two nuts in the front of the lower seat frame.
I drilled a hole there and used the same bolt there to fasten the seat to the frame. The seat tracks then stuck out 1/2 inch and I cut them
off so the seat side covers fit.


Increase Bucket Seat Legroom Tip 1966
From 64Tempestwagon @ Team Chevelle
First detach the two tracks from the seat. Remove the side covers as well. The rear portion of the seat frame in front of the rear preexisting
holes dives down about a 1/3 inch. I put the track onto the seat frame there and drilled a hole in the seat frame there (feel the metal there it's 2 layers thick).
I used a grade 8 bolt, lock washer, and nut there. It moved the seat frame forward about 2 inches.
Then I saw where the front of the seat track needed holes in the front over the preexisting two nuts in the front of the lower seat frame.
I drilled a hole there and used the same bolt there to fasten the seat to the frame. The seat tracks then stuck out 1/2 inch and I cut them
off so the seat side covers fit.
Last edited:
71350SS+454
Active Member
That kit is way over-priced considering it only fits one side and can easily be copied by someone with a little time
and hand skills. The square slots are easy to make by drilling two holes and using a sawzall or jigsaw to connect the dots.
That's if the slots are even nessasary at all
and hand skills. The square slots are easy to make by drilling two holes and using a sawzall or jigsaw to connect the dots.
That's if the slots are even nessasary at all
MMorgan62
Member
Went to town bought some 3/16x 2” stock . Got them cut,drilled out, and painted . I drilled only 1 set of holes instead of 2 like the ones for sale online, but gave myself 2 1/4” of leg room instead of 2. I am going to install under carpet . With that said , I could have ordered a set of pre made for around 33.00 shipped . I paid 30.00 for a 3’ piece of stock. Pro’s , it took me 30 minutes to make they are here and done instead of waiting a week . 64Tempestwagon, looks like you have a good method as well without loosing any head room. I will see how this goes, if it’s an issue I may go your route. Thanks all for the info. I’ll follow up with some install pics .
Attachments
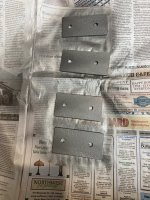
And you have 2 feet of spare flat bar, win win.
MMorgan62
Member
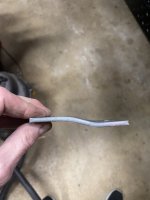
Day two, after fitting brackets , I decided to put bends in rear brackets to gain a bit more head room. Also welded bolts from underside for easier install,Then pre fitted . Brackets are now under the carpet, with just the bolts sticking up through carpet. Reinstalled seat. Turned out better than anticipated. I gained 2 1/4” of leg room, and about 3/4” much needed head room. Can’t tell there was a modification.
Attachments
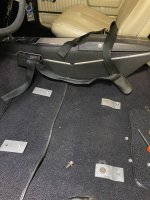
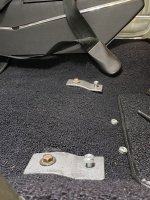
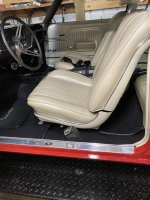
Great success!