What's new
Old Chevelles

Welcome to OldChevelles.com, built by Auto Enthusiasts for Auto Enthusiasts. Cars are not our only interests so please feel free to post about any subject the community might enjoy or you just feel you need to air.

We respect free speech and constructive dialogue however we don't allow threatening talk against members, nudity, or pornography. Threads are monitored and trolls are not tolerated.

This site is completely free and there are no costs. Please enjoy and provide feedback.
  • We've enabled the website app for anyone who wants to use it on a mobile or desktop device.

  • We've changed the header logo to display our Member's Cars.

    If you'd like your car to show up there, go to the forum Site Bugs & Feature Requests and post your image in the "Member's Car Pictures for the Header Logo" and we'll add your car into the lineup.

Trunk painting - anyone ever spray Raptor liner through an HVLP gun?

JohnC

Veteran Member
Senior Member
I'll be trying to paint my trunk pretty soon. Dad is coming out for a visit and we want to get some stuff done on the car and I'd like to have the trunk painted so I can start running the wire harness back there.
My plan is epoxy primer, than dark gray Raptor liner for the base color follow by aqua spatter paint from these guys:

guru-colors

The $79 kit includes the base color. The spatter is only about $21.
Supposed to provide the aqua spatter and is not water soluble like some of the spray bomb trunk paints so doesn't need to be clear coated.
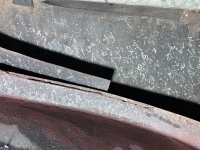
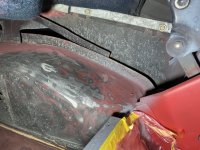
To be completely honest I'm not sure what the actual correct color combo is. Mine was light gray base with white spatter? Maybe I'm remembering wrong. Seems to me like at the most forward part of the truck in front of the wheel well, it looks much darker grey or almost blackish.

I've heard that spraying Raptor liner, reduced through an HVLP gun you can get much less texture which is what I'm looking for.
 
Last edited:
Looks like the original color was black with aqua spatter. Here’s a pic in the forward recesses of the trunk. So quite accidentally I’ll be going back to original. I guess the car’s prior owner did the light grey repaint. 506443E8-2F02-4971-A9C7-E9F4BE8F59A9.jpeg5E6A283F-ECEB-45F9-B8A5-7EF7CA4FB9A0.jpeg
 
4EA1FD3D-7B12-4B71-9445-8955E3D7F40D.jpeg
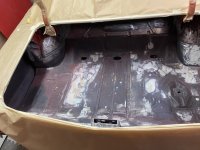
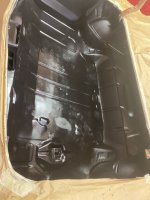
Trunk masked off. The trunk floor had some rust. I did the unwise (more labor) decision to replace the trunk floor in pieces. The 2/3 of the floor toward the DS is new. The 1/3 on the PS is original. I’m pretty pleased with how the seams came out. Fully welded the seams, then a coat of short strand filler and traditional body filler.

Going to spray Summit epoxy then the Raptor liner. YouTube videos recommended drilling out the purple gun to 2.0 mm and reducing the Raptor. I have a liter bottle of black left over from the underside of the car. I also bought some dark gray tinted stuff. So I might mix a little of each to get a very dark gray.
 
Last edited:
View attachment 10743
Trunk masked off. The trunk floor had some rust. I did the unwise (more labor) decision to replace the trunk floor in pieces. The 2/3 of the floor toward the DS is new. The 1/3 on the PS is original. I’m pretty pleased with how the seams came out. Fully welded the seams, then a coat of short strand filler and traditional body filler.

Going to spray Summit epoxy then the Raptor liner. YouTube videos recommended drilling out the purple gun to 2.0 mm and reducing the Raptor. I have a liter bottle of black left over from the underside of the car. I also bought some dark gray tinted stuff. So I might mix a little of each to get a very dark gray.
BLUESS454 is an expert in trunk refinishing, he has the whole process down pat.
 
I've developed a process that looks really close. Low air pressure, barely spitting out a thickened paint with an oversize tip, I use 2.0. I've never felt confident of the adhesion of the spatter, so I use a flattened clear to protect it from heavy abuse. The early spatter like you pictured was shot out stringy and laid out the same way,, the later stuff was more straight on blobs. Practice your technique, it's not hard, but does take a little practice.
 
Time to vent - I love painting and I hate painting. Amongst my other issues is I’m a klutz. I always seem to spill paint, drop shit, knock shit over with the hose, drag the hose through fresh paint, etc.
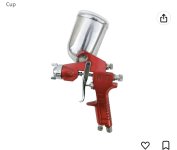
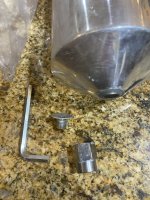
Epoxy primed the trunk tonight using this gun.
54F1D077-6EB6-4869-8521-7AF8D7CB388E.jpeg
Seems like a great gun for tight quarters because the cup swivels so you can theoretically shoot upside down. It actually sprays nice for a cheap gun. But the damn lid is press fit and flies off like it’s spring loaded if you look at it wrong.

Spraying Raptor liner through an HVLP I’m gonna use my primer gun because it’s got a 2.0 tip, but the gun is much larger and no way I can get way up in the front of the trunk unless I can hold the gun sideways.
I’ve always meant to try the ziplock bag trick as seen on YouTube. Basically line the cup with a ziplock bag, fill with paint and zip it closed. Kinda of like a ghetto Dekups system.
91A54B41-2193-4D22-9185-5CB5446C0949.jpeg

Look mom, I’m holding my gun sideways like a rapper!

68266330-76A3-4DD2-AFEB-04AD5747E3D0.jpeg
Best of all no spills. When you are done I guess you rip the bag out and clean up is a little easier too.
 
I'm so glad you asked this question. I'm looking to do the same on the interior and bed of my truck
 
If your lid is popping, make sure the vent is clear, usually a pinhole in the center of the lid. Chemicals reacting omit a bit of pressure.
 
I'm so glad you asked this question. I'm looking to do the same on the interior and bed of my truck
I did the underside of the Malibu and although it’s not been on the road, I like the look of the Raptor liner and am hopeful that it’ll be durable. It goes further than I thought it would. I bought the 4 liter kit and only ended up needing 3 of the bottles to do the underside of the 67 from the firewall back including the wheel wells. I’ll probably save the last liter bottle to do the bottom side of the inner fenders.
I always thought that if I were going to line Cheyenne’s bed I’d get the tintable version and tint it to match the body color.
 
CB5EAB38-C806-485F-9863-7368A3BB4B68.jpeg
Primed last night and touched up a few areas this evening. I put on the camping heater in the garage tonight and will run a fan overnight. It was still far from completely dry tonight. Need to get it dry so I can seam seal.
It looks a little splotchy in the pic. It’s got a couple good coats but the areas where there’s filler really soak it up.
I hope the bed liner can hide some sins because I’m got many to hide.
 
I sprayed the Raptor liner the other night. Per the recommendation I thinned and put in the HVLP gun with 2.0 tip and it was very thick and didn’t want to spray very well. Not sure what went wrong. It’s pretty thick stuff so even thinned I’m not sure how people are getting it to go thru an HVLP. Before it started to set up I dumped it back in the bottle and connected it up to the schutz gun where is seemed to spray fine.
Ended up with more texture than I wanted but I guess that’s what ya get when you use bed liner.


I’d call the “Guru Color” spatter paint an utter failure in my experience. Very unforgiving to spray. To be clear, this paint is only supposed to be the spatter part so in my case aqua (not the base color). The spatter droplets were pretty small. It didn’t really give a true spatter appearance. More like a lot of very small dots, smaller than they’re supposed to be. On top of that, the paint comes out fast, so if you aren’t moving your arms constantly and very fast, you end up tiger striping your trunk. In order to blend the stripes I ended up putting on way more aqua than I should have and the floor ended up more aqua than it should. That part will be covered by the mat but I’m not pleased. It doesn’t look like a proper spatter paint.

Not sure if I’ll leave it or get a traditional spatter paint and go over it.
 
Top Bottom