What's new
Old Chevelles

Welcome to OldChevelles.com, built by Auto Enthusiasts for Auto Enthusiasts. Cars are not our only interests so please feel free to post about any subject the community might enjoy or you just feel you need to air.

We respect free speech and constructive dialogue however we don't allow threatening talk against members, nudity, or pornography. Threads are monitored and trolls are not tolerated.

This site is completely free and there are no costs. Please enjoy and provide feedback.
  • We've enabled the website app for anyone who wants to use it on a mobile or desktop device.

  • We've changed the header logo to display our Member's Cars.

    If you'd like your car to show up there, go to the forum Site Bugs & Feature Requests and post your image in the "Member's Car Pictures for the Header Logo" and we'll add your car into the lineup.

Anyone powder coat?

JohnC

Veteran Member
Senior Member
I’ve been kicking around this idea. Wish I had done it sooner because I paid to have all my front suspension parts coated already. The oven is the challenge. All I have is a medium size toaster oven so I could do calipers and some brackets but not much more. Looks like you can get used ovens on CL for free or next to free. I’d want to be able to do a 15 inch rim and not sure it would fit in a regular oven.
Saw a guy on the internet who got a double oven, basically cut out the divider between and now has a taller oven.
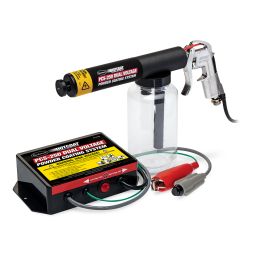
Just kicking around the idea. I’ve heard people get good results with the HF or Eastwood guns.
Anyone have any experience? With a regular oven I could do intakes, valve covers, brake calipers and backing plates etc for little investment.
 
You also have to sandblast or acid-dip everything first, so it gets pretty labor-intensive.
Had my 68 Camaro frame and suspension done years ago when it was cheap.
 
I've investigated what it would take and found unless you had a good number of parts to do it wasn't cost effective. If you were going to do alot of parts, then it was cost effective to create your own setup. There are a number of videos that show you have to create an oven (pretty cheaply I'll add) depending on the size you needed.
 
I powder my own parts. I have my wife's old kitchen oven in the shop. It will handle a 15" wheel and upper/lower a-arms.

Depending on the size and thickness of the part, 450* for 5-10min of flow-out, then 400* for 15-20min. Let cool, then ready to use. Run a small filter at the gun supply airline. I also run TWO air/water separator filters at the compressor as I do for my paint gun also.

If you have a pre-oiler for air-tools on your compressor, you will need to use another compressor.

My gun was purchased from Eastwood. An older version of the below:

The dual voltage is the best for maximum coverage of larger parts or running a thicker coverage without having to move the ground clip around.

I get all my powder from 'Powder by the Pond' :

More selection of colors. Plus they will color match. I have powdered some of my old FARMALL / International tractor parts and they color matched my International Red.

If you want a larger oven, you can buy one for a few thousand. A friend of mine in Virginia built his own. x2 old ovens and their heating elements. x4, 4x8' sheets of 16ga steel for the internal sides and door (Local metal shop). Another for the tops and bottom. Wrapped in high-temp wool insulation (Lowes). Aluminum stud outer frame with outer side of concrete backer board. He's into it for about 700$ (8yrs ago).
 
Thanks for your reply. I think I’m gonna do it. Checking out CL I’ve seen working ovens for free and if they can fit a 15 inch rim that’s all I need. I have a 220 outlet in the garage that I use to run my welder. I’ll probably do parts for the Chevelle, the C10 and for friends and family then give away or scrap the oven.
I saw videos of guys laying parts on the wire racks in the over. I assume that mars the finish in the areas where it touches?

Spraying the powder looks like a huge mess. Maybe I can get a refrigerator Card board box to make a ghetto paint booth.
 
What about the sprayers that use an electrode? or Static charge where you ground the part your painting/coating? Wouldn’t that keep the mess down?
 
It's not a huge mess but yes it gets all over everything in about a 4ft radius. Just fine powder though and doesn't stick to anything because the ground strap (gator-clip) grounds the part and that the only place where everything sticks. I just sweep it up. Yes if you rub the powdered item on ANYTHING or touch it, powder comes off.

I took the oven racks all out and put one of the racks on the very top rails.

I cut up metal clothes hangers and bent small metal hangers to hang parts off the top rack. I have many little hooks made. I hang the parts on the little hooks with the hook dangling on a string from the rafter. That way I can spin the part as I powder it. The oven has already preheated and sitting at temp. I take off the ground clip and use a pair of pliers, grab the hook with the part hanging on it and move it from the hanging line to the upper rack. That way I'm only touching or grabbing the hook as I hang it in the oven.

Now for bigger parts (like a wheel), I made a mount that the wheel sits on (laying down). The mount is bolted to an old cookie sheet. That cookie sheet I sit right on the bottom heating element.
 
What about the sprayers that use an electrode? or Static charge where you ground the part your painting/coating? Wouldn’t that keep the mess down?
I took this screen shot from a YT video I watched last night. I think the guy must have been paid by Eastwood for the video. Anyway it was his first time and he made this mess from Powder coating a single bead lock ring. lol🤣
IMG_3172.png
I guess it just sweeps up like dust through so not a big deal.
 
I took this screen shot from a YT video I watched last night. I think the guy must have been paid by Eastwood for the video. Anyway it was his first time and he made this mess from Powder coating a single bead lock ring. lol🤣
View attachment 17505
I guess it just sweeps up like dust through so not a big deal.
Does that have a wire or electrical charge wire going to the part getting painted? Ugly wheel color but each to their own lol And if it’s not sticking to the part it’s a lot of wasted material
 
Yes it sweeps up. I would never reuse it. You could reuse it but its super fine 'powder' and unless you have a hospital floor, it will pick up the finest particles and larger dust/dirt specs. It will leave les of a mess if you run the larger power setting on the gun. more electricity going through, the more charge the powder has and sticks more. Plus, it depends on how thick you want the covering. You know it's getting too thick as the powder particles start to stand up off the part like little hairs. It means the charge is no longer getting through the thick powder and to the part itself. If you mess up an area I use a Q-Tip to wipe it or lightly blow on it and it blows off the part. Then reapply. It doesn't have to be exactly as thick in the area because it will 'flow out' and settle. But get it close.

Yes the ground strap gets powdered as well. But once the part has been powdered, you take the clip off and put the part in the oven. Just wipe the powder off the clip.

If you don't wear a painter's mask, and if you powder all day, dont forget to blow your nose frequently. lots of powder to the nose and you dont even know it.

Als you can get on Powder by the Pound and learn about all the different kinds of powder. Some take different cook times.
 
Some questions:
1. This is just personal preference but I want to do my calipers and don’t want to do red because it looks a bit “boy racer” for stock parts. I’m thinking a cast gray or silver type PC. What color were calipers originally?

2. Does anyone know a specific orange that will match generic “Chevy orange” engine paint? I’m possibly gonna do some stock valve covers and my intake and would like to be close to off the shelf engine block spray paint.

3. For prep of things that might be greasy (diff cover, calipers) I plan to degrease with purple power or castrol Superclean then media blast. What other prep would you do? When would you bake to get rid of contaminants?

4. I plan to buy the silicone plugs and high temp masking tape. Is there anything else you can use to mask, like the piston bore of the calipers? Aluminum foil?

Thanks. Prob more questions to come. Still reading up.

Any tips are welcome.
 
1. I personally do not know the color.
2. For color, If you want an exact color like I did for my Farmall tractor it might have to be custom matched. Select and orange that is well supplied that you will be able to buy for years. Like a Rustolium or a major brand. Contact 'Powder By the Pound'. Check their site and see if they have something close. If they dont and you want it EXACT, they will make a custom color to match your piece you send them. Its a $120 charge for them to custom match powder.
3. For degreasing of really bad parts, you need to strip down to bare metal. Then dip the part in a 5gal bucket with dish soap as it will strip most of the grease. Then I use the below I buy at O'Reilly's Auto :
1706331221687.png
Let air dry or in the sun for a few minutes or HP Air dry.
Then wipe with a lint free rag. Only touch the part with rubber gloves to not get skin grease or body oil on the part

4. for masking. Yes on the plugs and tape. Definitely on the aluminum foil. I use a lot of that.
I once did a pair of COMP CAM valve covers that had the COMP with raised checker flags. I used Aluminum foil to wrap the covers and fiberglass tape up against the edges. One I powdered, I used a few Qtips to wipe off the powder on the raised areas. Then baked them.

With big parts. Make sure you have everything set up in the oven correctly to not rub anything with powder. PRACTICE your setup and how you will move the parts from hanging and powder, to the oven PRIOR to staring the oven or powdering the part. You'll thank yourself later.
 
Thanks. That helps a lot. Another question I had forgotten. Do you ever preheat the parts kind of like hot flocking to get the power to stick better? And if so what temp is high enough to serve that purpose?

Thanks
 
The only time I preheat is if I'm using high-temp. Some of them require it. Though if you are doing a complex part that may trap water or solvents, I'd bake it for about 30min to burn off residue. Then let it hang cool for about and hour on you powder platform. Once cool, Powder.

Standard powders are good to about 500* on the average. After that, there are different stages of heat ranges that have special requirements. I've only 'cleared' a few items. which takes low heat or it turns aa burnt clear color. I really don't do it anymore because most colors come in matte all the way to super high gloss.

Just like paint, start your powder at the complex parts/joints as its harder to get in there and work out. once done and if you want a higher build, go back to the hard to get areas and work out again.
 
Powder coated some parts tonight. It was a learning experience and overall I’m pleased.
I just used the HF matte black which I know a lot of people don’t like. I sifted it through a dollar store strainer to get out the lumps. Cleaned and media blasted some parts and baked at 450 to try to burn off any left over crap.
I made a ghetto paint booth to control the mess a bit with a big box with an ac filter in the back and a fan behind it.
IMG_3354.jpegIMG_3355.jpeg
 
There was a point when I put the gun down and unhooked and air and when I picked it up again and pulled the trigger it shot out a big cloud of power that settled on the diff cover in a lumpy manner. I should have blown it off and started over but I hoped it would self level a bit when baked. Unfortunately it ended up looking a bit lumpy. But it’s a diff cover so I’m not gonna sweat it too much.
Color is a little flatter than I like but no biggie. Overall I’m happy. IMG_3358.jpegIMG_3361.jpeg
 
I ordered this color for other parts like brake calipers. I don’t think I’ll be clear coating so it won’t look this shiny.
IMG_3362.jpeg
 
Overall I think it looks good. Yes there are sometimes leftover powder in the gun. When I'm done for the moment on a part, I hang my gun. Residual powder will sometimes fall out. I also turn my air off at the base of the gun. When going back to powder, I shake the gun (nozzle down), squeeze the trigger and open the air feed on the gun until I get the desired flow. I also hang most of my parts to powder which also keeps the initial burp of powder from jumping out and laying on the part.

That particular color may not be that shiny but most times you can get a color with super gloss. I have very rarely used clear. Most colors I order you can get in different glosses that look just like that without gloss.

Great start. After a few parts, you're going to wonder why you never did this in the first place. Durable immediate use, ...

I have only had to filter powder from a crappy vendor. Other powders from bigger stores, I never filter.

The backing plate, looks like you could have gone thicker on the powder. Usually a good indicator is you know you've gone the max thickness when the powder starts to stand up like arm hair.

What was your initial heat and bake temp and times?

Mine are 450* initial for 5-10min (pending size and thickness) and 400* for 20-30min. I just open the door to peek in and look at the coat and how its settling and flatness.
 
Last edited:
Thanks for your thoughts. I put the items in a cold oven and turned it to 450. Once the temp of the part got to about 440 ish I gave it about 10 minutes then turned the over down to 400 and set the timer for 25 min. Temp measured with an IR gun.

Can that rough area be flattened and recoated?
 
Last edited:
Top Bottom