What's new
Old Chevelles

Welcome to OldChevelles.com, built by Auto Enthusiasts for Auto Enthusiasts. Cars are not our only interests so please feel free to post about any subject the community might enjoy or you just feel you need to air.

We respect free speech and constructive dialogue however we don't allow threatening talk against members, nudity, or pornography. Threads are monitored and trolls are not tolerated.

This site is completely free and there are no costs. Please enjoy and provide feedback.
  • We've enabled the website app for anyone who wants to use it on a mobile or desktop device.

  • We've changed the header logo to display our Member's Cars.

    If you'd like your car to show up there, go to the forum Site Bugs & Feature Requests and post your image in the "Member's Car Pictures for the Header Logo" and we'll add your car into the lineup.

My 69 project

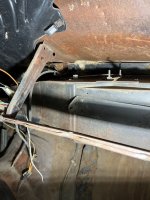
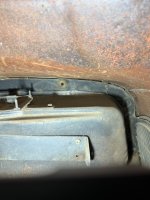
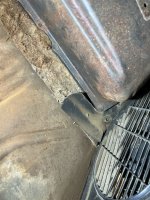
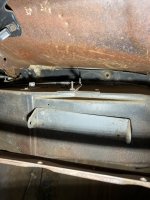
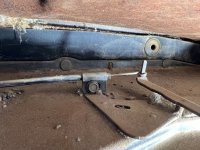
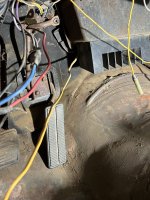
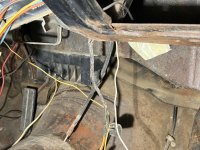
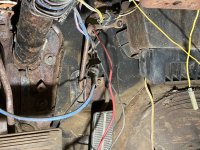
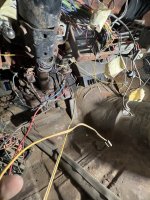
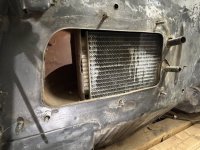
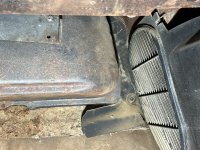
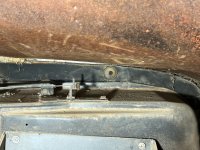
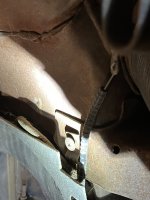
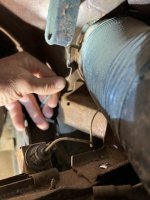
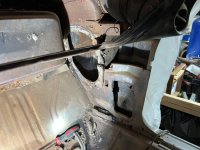
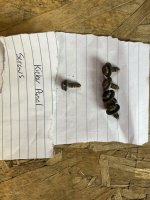
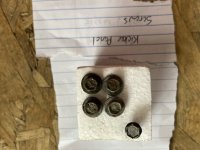
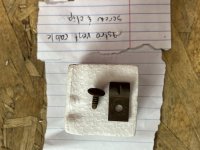
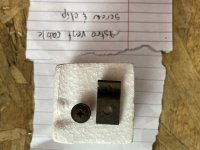
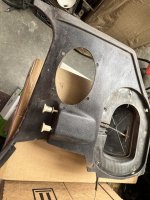
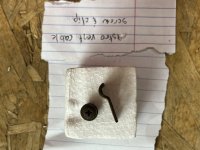
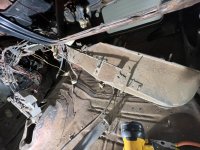
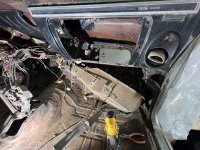
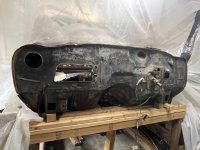
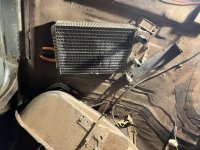
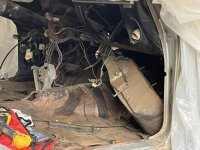
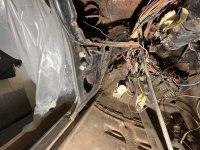
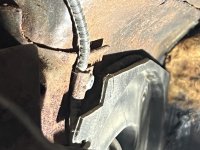
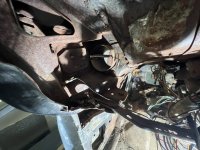
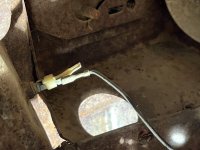
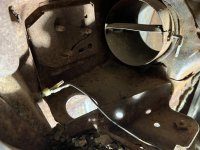
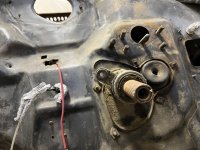
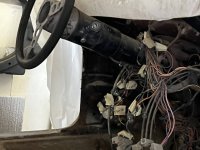
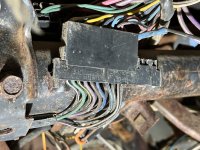
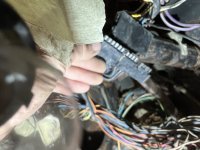
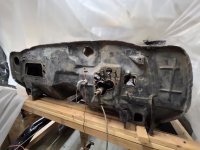
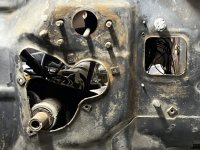
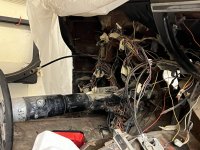
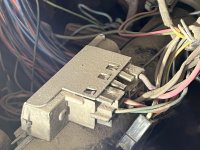
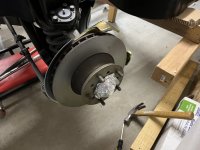
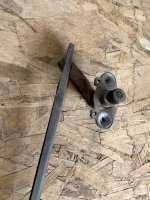
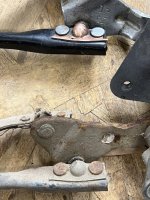
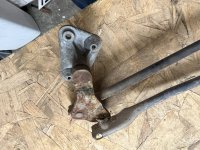
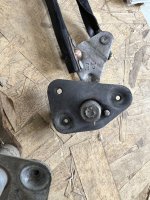
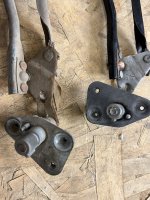
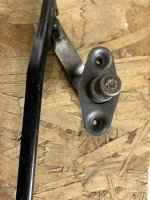
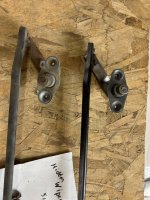
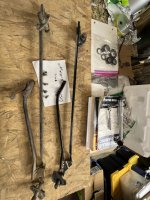
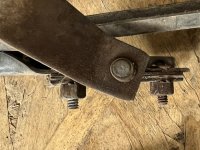
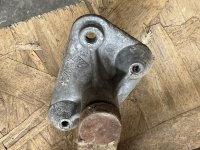
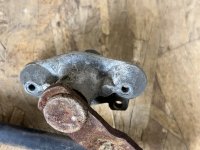
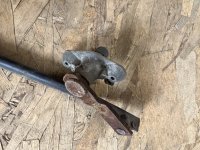
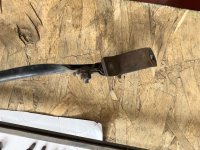
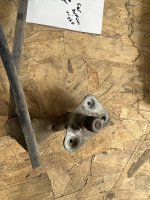
Added more detailed pictures of my original hidden wiper and also one that I got from my last cl find. Noticed some numbers stamped.
 

Attachments

  • 2B7A74D6-EA3C-4F34-8631-ACC0F7A13524.jpeg
    2B7A74D6-EA3C-4F34-8631-ACC0F7A13524.jpeg
    241.8 KB · Views: 16
  • 0024CB28-A03D-4B46-A8DC-A55FB5820992.jpeg
    0024CB28-A03D-4B46-A8DC-A55FB5820992.jpeg
    229.6 KB · Views: 10
  • 0CB4D743-743A-4BED-93F4-392821D8992D.jpeg
    0CB4D743-743A-4BED-93F4-392821D8992D.jpeg
    224.3 KB · Views: 4
  • C7815D0F-11B9-47B6-B309-E9B033ADD2FB.jpeg
    C7815D0F-11B9-47B6-B309-E9B033ADD2FB.jpeg
    223.4 KB · Views: 4
  • 0CD10994-D6F3-4834-B444-FCE1D93FBC94.jpeg
    0CD10994-D6F3-4834-B444-FCE1D93FBC94.jpeg
    230.7 KB · Views: 4
  • 6E3D4448-2DAA-4640-855F-B14898E376AF.jpeg
    6E3D4448-2DAA-4640-855F-B14898E376AF.jpeg
    169.4 KB · Views: 3
  • D6CD1813-67C1-414B-A98A-C36AA5BA6051.jpeg
    D6CD1813-67C1-414B-A98A-C36AA5BA6051.jpeg
    223.1 KB · Views: 2
  • 42EE011E-E1F7-485A-9D94-777747209D48.jpeg
    42EE011E-E1F7-485A-9D94-777747209D48.jpeg
    205.8 KB · Views: 1
  • 3128AD8D-EC66-4483-9CE2-31C2C260226A.jpeg
    3128AD8D-EC66-4483-9CE2-31C2C260226A.jpeg
    181.9 KB · Views: 2
  • 204CAA05-EC0C-473E-A8B3-BDF4CB60ECD4.jpeg
    204CAA05-EC0C-473E-A8B3-BDF4CB60ECD4.jpeg
    195 KB · Views: 2
  • CE4E8AE4-CD14-4863-8918-5FBFF1CD8BAA.jpeg
    CE4E8AE4-CD14-4863-8918-5FBFF1CD8BAA.jpeg
    146.8 KB · Views: 2
  • E21FA29E-4A1B-42C5-90AB-616C360CF857.jpeg
    E21FA29E-4A1B-42C5-90AB-616C360CF857.jpeg
    234.4 KB · Views: 2
  • CF20FA48-7E75-4EF7-9FDC-444E8BBC981A.jpeg
    CF20FA48-7E75-4EF7-9FDC-444E8BBC981A.jpeg
    209.3 KB · Views: 2
  • 587EAC11-610D-4E21-87ED-471CB3662D15.jpeg
    587EAC11-610D-4E21-87ED-471CB3662D15.jpeg
    235.2 KB · Views: 4
Next remove heater box cover inside. Here are some pictures of a mess of wires under the dash, but beyond that the cover.
 

Attachments

  • FE5673E9-9CF7-4428-A611-1B067098CB99.jpeg
    FE5673E9-9CF7-4428-A611-1B067098CB99.jpeg
    167.6 KB · Views: 3
  • 19BAE418-D75A-46F2-B8E3-424007FB1687.jpeg
    19BAE418-D75A-46F2-B8E3-424007FB1687.jpeg
    140.1 KB · Views: 3
  • D6D7DA34-C4DB-4810-89FD-6004E80E8447.jpeg
    D6D7DA34-C4DB-4810-89FD-6004E80E8447.jpeg
    223.4 KB · Views: 2
  • 5698F58F-69E6-4667-814E-6EACC0124F7A.jpeg
    5698F58F-69E6-4667-814E-6EACC0124F7A.jpeg
    153.3 KB · Views: 2
  • 07466BBD-4AB2-4984-96A4-A325F425506D.jpeg
    07466BBD-4AB2-4984-96A4-A325F425506D.jpeg
    193.2 KB · Views: 2
  • BEC25128-5A67-49D5-BC8A-70F22C35F13C.jpeg
    BEC25128-5A67-49D5-BC8A-70F22C35F13C.jpeg
    222.2 KB · Views: 2
  • 8EE23D93-B77A-49CB-9D3F-026D3495D58A.jpeg
    8EE23D93-B77A-49CB-9D3F-026D3495D58A.jpeg
    188.5 KB · Views: 2
  • 40AD9E26-D8EA-4392-8955-EDDBC09E38F2.jpeg
    40AD9E26-D8EA-4392-8955-EDDBC09E38F2.jpeg
    249.3 KB · Views: 2
  • 8B489361-636D-4EBE-AAEB-0F47D79EB456.jpeg
    8B489361-636D-4EBE-AAEB-0F47D79EB456.jpeg
    217.8 KB · Views: 2
  • 5342BCC6-9AAF-4C5B-8E65-CF29C52E8825.jpeg
    5342BCC6-9AAF-4C5B-8E65-CF29C52E8825.jpeg
    199.8 KB · Views: 3
  • EF64BA5F-BAAE-4095-B1A0-037C09F70581.jpeg
    EF64BA5F-BAAE-4095-B1A0-037C09F70581.jpeg
    175.1 KB · Views: 3
  • 3FDA559C-FC0E-45DC-BEA7-2E631E0EF255.jpeg
    3FDA559C-FC0E-45DC-BEA7-2E631E0EF255.jpeg
    260.4 KB · Views: 3
  • FDE12565-2057-4155-8AA6-2CD4C2EA269A.jpeg
    FDE12565-2057-4155-8AA6-2CD4C2EA269A.jpeg
    192.9 KB · Views: 4
Are you using a turbo 400 tranny? If so, you'll need the kickdown switch which mounts to the gas pedal bracket which is unique for the SuperSport.
 
Are you using a turbo 400 tranny? If so, you'll need the kickdown switch which mounts to the gas pedal bracket which is unique for the SuperSport.
Yes I will be putting a th400. It’s in a c10 now and I’m not even sure where that came from yet. I will have to look through some things I have. Thanks for the heads up.
 
Removed the passenger side kicker panel. Pictures are of a clip that holds the cable for the vent. I found it easier to remove the dog ear end. Still was loads of fun. Wire connects to vent.
 

Attachments

  • 740F1B94-FA53-49C2-B975-8970CD041591.jpeg
    740F1B94-FA53-49C2-B975-8970CD041591.jpeg
    129.5 KB · Views: 3
  • 798084B9-6844-4B57-9214-8CB7BBDF80E4.jpeg
    798084B9-6844-4B57-9214-8CB7BBDF80E4.jpeg
    123.1 KB · Views: 3
  • 3DED9912-2132-47BD-8CE0-DC5D3A1E9579.jpeg
    3DED9912-2132-47BD-8CE0-DC5D3A1E9579.jpeg
    162.4 KB · Views: 2
  • 94DBF4A4-02E7-4967-8D05-FC291C930785.jpeg
    94DBF4A4-02E7-4967-8D05-FC291C930785.jpeg
    166.7 KB · Views: 2
  • C624CE90-E91E-449C-ACA2-D887C6C86084.jpeg
    C624CE90-E91E-449C-ACA2-D887C6C86084.jpeg
    112.4 KB · Views: 2
  • 6407BE94-CFC6-411F-9BA4-876530E4576A.jpeg
    6407BE94-CFC6-411F-9BA4-876530E4576A.jpeg
    122.2 KB · Views: 3
  • C06753FC-D59D-4204-81B9-75678E485A55.jpeg
    C06753FC-D59D-4204-81B9-75678E485A55.jpeg
    112.3 KB · Views: 2
  • 8B0F30F2-8063-4653-929E-83CC6B95112E.jpeg
    8B0F30F2-8063-4653-929E-83CC6B95112E.jpeg
    204.7 KB · Views: 2
  • 61DD71FB-08A9-4A01-A6DD-E7E6CA4C85C9.jpeg
    61DD71FB-08A9-4A01-A6DD-E7E6CA4C85C9.jpeg
    121.2 KB · Views: 2
Took down the heater box and removed heater core. Just the drivers side kicker panel to remove and the steering column. Block as much off and blast.
 

Attachments

  • F34EE545-CB1A-49B8-BB80-D53061F04D24.jpeg
    F34EE545-CB1A-49B8-BB80-D53061F04D24.jpeg
    202.8 KB · Views: 1
  • 56D92C5D-6471-4805-8542-2594476DC654.jpeg
    56D92C5D-6471-4805-8542-2594476DC654.jpeg
    200.5 KB · Views: 1
  • 2A5D83A2-B914-4C2B-AAAA-9FB9D6BE603C.jpeg
    2A5D83A2-B914-4C2B-AAAA-9FB9D6BE603C.jpeg
    124.6 KB · Views: 1
  • 6C6A4482-924C-4780-A920-6BBC8EFA1B10.jpeg
    6C6A4482-924C-4780-A920-6BBC8EFA1B10.jpeg
    228.1 KB · Views: 1
  • 9D7EA063-220F-46F9-8E7D-B1418AF079C0.jpeg
    9D7EA063-220F-46F9-8E7D-B1418AF079C0.jpeg
    147.3 KB · Views: 4
Took out the drivers side kicker panel. It was easier knowing from the passenger side and also my e brake was already removed. Took off clip for cable and removed from vent flap. I also took pictures of a red wire attached to the body. Next steering column.
 

Attachments

  • C15116EE-027D-4ABA-A66F-4D2B491417AF.jpeg
    C15116EE-027D-4ABA-A66F-4D2B491417AF.jpeg
    202.4 KB · Views: 5
  • 7E0ABE71-2BF3-4956-8286-911B1322E87D.jpeg
    7E0ABE71-2BF3-4956-8286-911B1322E87D.jpeg
    144.9 KB · Views: 5
  • 84697FBD-E353-4EF5-ABEB-AD04FC750A40.jpeg
    84697FBD-E353-4EF5-ABEB-AD04FC750A40.jpeg
    150.4 KB · Views: 5
  • E3628998-9CB0-4777-86A2-2D988BFEF5A2.jpeg
    E3628998-9CB0-4777-86A2-2D988BFEF5A2.jpeg
    229.3 KB · Views: 5
  • 0964202E-0C98-4A2F-8AB5-DE23757830A5.jpeg
    0964202E-0C98-4A2F-8AB5-DE23757830A5.jpeg
    171 KB · Views: 6
  • A22D6219-2625-4C27-AEB2-58EA1B95ABC3.jpeg
    A22D6219-2625-4C27-AEB2-58EA1B95ABC3.jpeg
    118.2 KB · Views: 6
  • F0C77193-8BA5-4AA7-9AC8-86A4E2B1F3D1.jpeg
    F0C77193-8BA5-4AA7-9AC8-86A4E2B1F3D1.jpeg
    147.8 KB · Views: 7
Almost finished pulling the steering column. Just have to unclip the last connectors. To remove I pulled the screws from the floorboard plate, then I unclipped the connector on side of column. Once unclipped I pulled the two nuts off the underside of dash allowing the column to drop revealing two more connectors. Once unclipped steering column is free.
 

Attachments

  • 0A24A9DD-6B8E-4537-8069-DBF22E794109.jpeg
    0A24A9DD-6B8E-4537-8069-DBF22E794109.jpeg
    153.9 KB · Views: 3
  • 30C0E75C-9150-4A6B-A1DA-53C973072F49.jpeg
    30C0E75C-9150-4A6B-A1DA-53C973072F49.jpeg
    116.9 KB · Views: 4
  • 6A8ACA6B-2EB2-4EDE-8B1E-4C4DAC0C404A.jpeg
    6A8ACA6B-2EB2-4EDE-8B1E-4C4DAC0C404A.jpeg
    206.3 KB · Views: 4
  • BDDF976E-6D48-46E2-90AA-61B9221C13DA.jpeg
    BDDF976E-6D48-46E2-90AA-61B9221C13DA.jpeg
    121 KB · Views: 5
  • 2F3DF7F0-17CA-4C95-B614-4F57F9CB62D9.jpeg
    2F3DF7F0-17CA-4C95-B614-4F57F9CB62D9.jpeg
    125 KB · Views: 4
  • 568094C0-81FE-4BE6-970B-41A96D0DB04B.jpeg
    568094C0-81FE-4BE6-970B-41A96D0DB04B.jpeg
    163.7 KB · Views: 4
  • 467AE9D4-4160-43AD-90E5-F5417973C7C2.jpeg
    467AE9D4-4160-43AD-90E5-F5417973C7C2.jpeg
    167.1 KB · Views: 3
  • 6E8CA6BB-BCD0-4904-B272-DBE27DFFCA40.jpeg
    6E8CA6BB-BCD0-4904-B272-DBE27DFFCA40.jpeg
    147.5 KB · Views: 6
Watch the after market switches and column parts, I have had bad luck with them. Try to reuse original stuff when you can.
Thanks for the advice. I’m hoping with some inspecting and cleaning things work ok. At the moment I’m working on getting the front part of the body ready for blasting.
 
Torqued anchor bolt and knuckle bolts. Greased the bearings, seal and installed rotors. Torqued to 12lbft and backed off to install cotter pin.
 

Attachments

  • D86C5AF4-2C09-451B-9D24-72424351BC6A.jpeg
    D86C5AF4-2C09-451B-9D24-72424351BC6A.jpeg
    157 KB · Views: 5
  • E731EAF8-C0E3-4E21-8904-E98962F356AA.jpeg
    E731EAF8-C0E3-4E21-8904-E98962F356AA.jpeg
    123.4 KB · Views: 5
  • 47F1A613-22A4-4833-BF0E-026D479EE657.jpeg
    47F1A613-22A4-4833-BF0E-026D479EE657.jpeg
    167.5 KB · Views: 6
  • CE73FFBD-A97C-412B-80FF-1D120BE570E8.jpeg
    CE73FFBD-A97C-412B-80FF-1D120BE570E8.jpeg
    132.5 KB · Views: 6
  • 377301D5-1CDE-4031-8BBB-0C2F47FCB48D.jpeg
    377301D5-1CDE-4031-8BBB-0C2F47FCB48D.jpeg
    135.8 KB · Views: 6
Nice work again, the hubs look perfect. I torque the castles to 50lbs, then back off while rotating, then back to 10lbs, then back off a full cog on the castle. FYI, the castle cap with the nipple is available through "The Parts Place", that's the only place I've found one that look right and actually fits.
 
Nice work again, the hubs look perfect. I torque the castles to 50lbs, then back off while rotating, then back to 10lbs, then back off a full cog on the castle. FYI, the castle cap with the nipple is available through "The Parts Place", that's the only place I've found one that look right and actually fits.
Ok thanks I need some.
 
Top Bottom