What's new
Old Chevelles

Welcome to OldChevelles.com, built by Auto Enthusiasts for Auto Enthusiasts. Cars are not our only interests so please feel free to post about any subject the community might enjoy or you just feel you need to air.

We respect free speech and constructive dialogue however we don't allow threatening talk against members, nudity, or pornography. Threads are monitored and trolls are not tolerated.

This site is completely free and there are no costs. Please enjoy and provide feedback.
  • We've enabled the website app for anyone who wants to use it on a mobile or desktop device.

  • We've changed the header logo to display our Member's Cars.

    If you'd like your car to show up there, go to the forum Site Bugs & Feature Requests and post your image in the "Member's Car Pictures for the Header Logo" and we'll add your car into the lineup.

Rear bumper alignment issues

Andy69

Well-Known Member
Senior Member
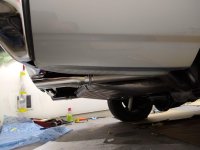
Got the rear bumper installed. Took me a bit because I had to repaint the tail light housings.

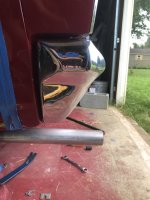
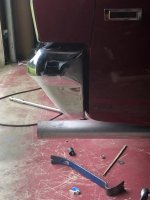
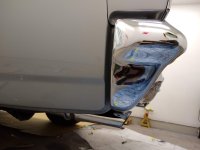
It looks “ok”. Not great, and it’s not tightened down all the way. The issue is when the upper two bolts on the outer brackets are tightened all the way up, the top of the bumper gets pushed up and rotated toward the back of the car.

All four bolts on each of the outer brackets need to be shimmed, but there is no way to get shims on the top ones.

Not sure how to proceed here short of modifying the rear bumper brackets. I can get the bumper into the right position but as soon I tighten everything down it’s thrown out.
 

Attachments

  • 23F9DBBF-674E-4637-990D-C22D4263E402.jpeg
    23F9DBBF-674E-4637-990D-C22D4263E402.jpeg
    116.7 KB · Views: 15
No way to get the shims in because of space to get your hands in, or it'll throw the alignment off?
 
No way to get the shims in because of space to get your hands in, or it'll throw the alignment off?

With the way the top of the bracket is formed along with the shape of the body at that part of the car doesn’t leave enough room to get any shims in.

I supposed I could remove the bumper and tape some shims on to the bracket but I could see that becoming old pretty quickly, trying to install it with some weakly taped shims balanced in the top of the bracket.

Here's an idea.... if you have a mig, set the shim where you want it and tack it on the inside of where the bolt goes through. That'll hold it tight and in place, but won't been seen at all.
 
I've never needed shims in that area, but it's certainly possible. Make the best guestimate on shimmage then r and r it again and use some dum dum to stick shims on top of the bracket. Either that or apply some clay then fit it, then measure the clay and shim accordingly. Your pic looks as good as the factory lkely spit it out, but if you want it perfect, you always have to think outside the box.
 
I've never needed shims in that area, but it's certainly possible. Make the best guestimate on shimmage then r and r it again and use some dum dum to stick shims on top of the bracket. Either that or apply some clay then fit it, then measure the clay and shim accordingly. Your pic looks as good as the factory lkely spit it out, but if you want it perfect, you always have to think outside the box.
That seems like what needs to happen. I slept on it and nothing better has come to mind. The old bumper fit perfectly. Must be a poorly constructed repro bumper.
 
That seems like what needs to happen. I slept on it and nothing better has come to mind. The old bumper fit perfectly. Must be a poorly constructed repro bumper.
That has been what I have found and this is the reason I use Tri City Plating, expensive but worth it. Nothing beats OEM
 
That has been what I have found and this is the reason I use Tri City Plating, expensive but worth it. Nothing beats OEM

I had to stack about an inch and a half of shims under the radiator support (actually I used washers). It’s a mid 2000s Goodmark and the pads are in the wrong place. I should have fixed it but by the time I figured out what the deal was it was already painted and installed and I just said easy button and moved on
 
Dug these up...
 

Attachments

  • IMG_20181209_155232017.jpg
    IMG_20181209_155232017.jpg
    80.9 KB · Views: 6
  • IMG_20181209_155238603.jpg
    IMG_20181209_155238603.jpg
    99.3 KB · Views: 6
  • IMG_20181209_155254733.jpg
    IMG_20181209_155254733.jpg
    97.2 KB · Views: 8
I think what’s happening in my case is there is enough room when the bumper is sitting at the right height but when I tighten it down the upper part of the bracket presses against the vertical part of the trunk floor and pushes the top of the bumper outward. My guess is a poorly designed reproduction bumper. I’ll figure it out I guess.
 
Ok, spent another few hours on it.

Put 3/8” of shims at each upper bolt. It’s not exactly where I would like it but the factory spec is 3/4” gap and it’s pretty close to that. I would have like it to be much closer but as long as it’s even all around I’m not going to mess with it any more. It’s not a Z16 convertible or an Evening Orchid Camaro, so I’m going to move on.
 

Attachments

  • FCAB2667-F966-441B-A96E-BEA93AEE035A.jpeg
    FCAB2667-F966-441B-A96E-BEA93AEE035A.jpeg
    114.3 KB · Views: 4
Last edited:
Top Bottom