What's new
Old Chevelles

Welcome to OldChevelles.com, built by Auto Enthusiasts for Auto Enthusiasts. Cars are not our only interests so please feel free to post about any subject the community might enjoy or you just feel you need to air.

We respect free speech and constructive dialogue however we don't allow threatening talk against members, nudity, or pornography. Threads are monitored and trolls are not tolerated.

This site is completely free and there are no costs. Please enjoy and provide feedback.
  • We've enabled the website app for anyone who wants to use it on a mobile or desktop device.

  • We've changed the header logo to display our Member's Cars.

    If you'd like your car to show up there, go to the forum Site Bugs & Feature Requests and post your image in the "Member's Car Pictures for the Header Logo" and we'll add your car into the lineup.

Rear brakes won’t bleed - no fluid

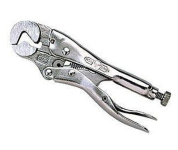
That doesn't explain your pedal not going full travel. I've used SS lines on several cars, and had the problems with getting the fluid to seal so I started using my vise grip designed for nuts......works great. While off the car, I take the component, be it master, prop valve, T, whatever, and place them in the vice, then take the corrosponding line nut and seat them several times. You can get a bit more of a turn for a few trys, then nothing more....and you've just created a perfect mate. Now, while on the car in non-optimum settings, it's much easier to seat them with your quality line wrench.
1694701526749.png
 
That doesn't explain your pedal not going full travel. I've used SS lines on several cars, and had the problems with getting the fluid to seal so I started using my vise grip designed for nuts......works great. While off the car, I take the component, be it master, prop valve, T, whatever, and place them in the vice, then take the corrosponding line nut and seat them several times. You can get a bit more of a turn for a few trys, then nothing more....and you've just created a perfect mate. Now, while on the car in non-optimum settings, it's much easier to seat them with your quality line wrench.

View attachment 14493

No, and I think that's a separate issue. I need to make sure the rod on the booster is adjusted properly and the extension to the pedal is the right length.
 
Ok, there was too much preload on the piston, so I turned the pushrod from the booster in as far as it would go, then had to shorten the insert about 1/16 to get the right position.

Thing is, I still get about 2 inches of travel on the pedal before hitting a hard limit. Looking at the rod, I had it adjusted with about 1/8” of initial play in the pedal before the rod touched the piston. I really don’t see how making the rod any shorter is going to give me more pedal movement before it hits that limit. It’s just going to give me more pedal play followed by the same amount of piston travel. It will just relocate the 2 inches of travel a little closer to the floor but won’t change anything.

I’m going to tighten down the lines, then start looking at the booster. I think the booster is the component that’s limiting the travel. The MC should have about 1 1/8” of piston travel, and looking at the end of the rod attached to the brake pedal, it’s moving about half that.
 
Well, so much for that idea. Remove the MC and the pedal goes all the way to the floor. The rod on the booster moves through the whole range.

So the MC is limiting the travel. I’ve never seen that before. Every GM A body I’ve had the pedal goes to the floor.

There isn’t enough travel to build up any pressure or move much fluid. Same thing as with the previous MC
 
Well, so much for that idea. Remove the MC and the pedal goes all the way to the floor. The rod on the booster moves through the whole range.

So the MC is limiting the travel. I’ve never seen that before. Every GM A body I’ve had the pedal goes to the floor.
I might be moving my 68 later today, if nobody is rushing me I'll try to measure how much pedal travel I have and how far from floor when brakes are pushed, moving it to put a gun safe behind it in a corner, guys helping might be in a rush
 
ok. It gets weirder.

Swapped back to the 1” bore MC. Id had it apart so there was no fluid in it. I did not bench bleed it. Empty, the pedal went to the floor. I started with the front, filled it, and pumped and filled until the level stayed the same. I felt the pedal gradually firm up. Then I did the rear. Pedal firmed up more. It’s sitting pretty close to where it was except it feels like an actual brake pedal instead of a rock. It’s got brakes, but they require a lot of pedal effort even with the power assist.

Im going to work on the connections then try it again. I think I’m getting somewhere
 
A TC member named Hotwire mentioned he had the 1-1/8" bore vette MC with power brakes and loved it (using LS1 brakes).
He said the pedal effort was perfect.
 
I think what was happening was the crap inside the MC was plugging it up and causing fluid lock. That would feel like hitting a hard mechanical limit. I’ll bet if I opened the one I just bought the other day I would find the same thing. I have to wonder if they tested it using regular brake fluid and didn’t clean it entirely and the residual reacted with the silicone fluid And that was the source of the trash.
 
I've been deaing with the same issue on my stock '70 Elky power drum brake car. After walking away from it for a few months, I got back on it yesterday and started at square one. What I found is that the clevis on the brake booster was unthreaded to the max and still pulled the pedal down 1/2 inch, which is the travel that I lacked to actuate the master cylinder piston properly. I've got a new booster coming, this one's provance is unknown and obviously too short, plus I want a nice gold one with Delco Moraine stamped on it.
Trey removing the clevis pin and threading or un threading the clevis til it drops in with the brake pedal in the full up position. If tis already where it needs to be, then I don't know either...

I’ve got the rod adjusted so the pedal has about 1/16” play. Same with the booster rod and the MC piston, so I’m pretty confident that’s correct. I actually had to take a bit off of the piston insert to get it right as I had the booster rod in as far as it would go.

I went around the car and tightened the stainless lines. Some of them were not tight enough for sure. I cranked them in and out 3-4 times each time getting them a little tighter before cranking them as tight as I could without risking stripping the nut.

I’m going to try bleeding again, hope I can get something this time.
 
Looks like I have brakes. They require quite a bit of effort but the pedal is quite firm and high. I think I need to replace the one way valve on the booster along with the grommet. I think I’m getting leakage. Plus I still have something making a racket at low idle.

Getting close to a maiden voyage, except for the junk in the way.
 
Glad you stuck with it Andy. Even if it's just a short drive, at least you can say you did.

Next season will be a much longer drive season you and your wife will enjoy.
 
Top Bottom