What's new
Old Chevelles

Welcome to OldChevelles.com, built by Auto Enthusiasts for Auto Enthusiasts. Cars are not our only interests so please feel free to post about any subject the community might enjoy or you just feel you need to air.

We respect free speech and constructive dialogue however we don't allow threatening talk against members, nudity, or pornography. Threads are monitored and trolls are not tolerated.

This site is completely free and there are no costs. Please enjoy and provide feedback.
  • We've enabled the website app for anyone who wants to use it on a mobile or desktop device.

  • We've changed the header logo to display our Member's Cars.

    If you'd like your car to show up there, go to the forum Site Bugs & Feature Requests and post your image in the "Member's Car Pictures for the Header Logo" and we'll add your car into the lineup.

Drum brake assembly

JohnC

Veteran Member
Senior Member
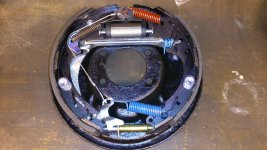
I took some pics but unfortunately they aren’t as useful as I had hoped. The drum brakes were completely disassembled to clean up and paint the diff housing etc.
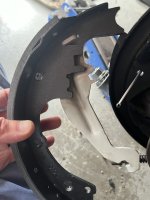
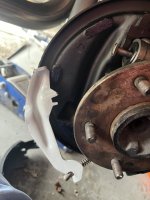
The part that’s really confusing me is the parking brake cable and this grey lever in the pic. Anyone know how this goes together?
From the pics I see online, this lever mounts first, then the rear shoe goes on over it. So it sits behind the shoe as you’re looking at it from the side. But I’m not sure hot it’s retained, what it connects to etc. anyone know?

IMG_3434.jpeg
 
You can see the e brake lever sits behind in this pic. I tried to get an image that was clean and clear enough to see.

DSC_0398-86723900.jpg
 
That arm attaches to the secondary shoe before you assemble. The upper tang kind of twists into the shoe slot.
 
That arm attaches to the secondary shoe before you assemble. The upper tang kind of twists into the shoe slot.
Thanks guys. You are exactly correct. There is a little metal hook that goes through a hole in the shoe. IMG_3436.jpeg
 
......and nice manicure! I don't believe my nails upper or lower have ever looked like that.
Finally someone notices! Thanks.

I have to keep them a little clean because of my job. It’s a little embarrassing to have grubby nails. I wear a lot of nitrile gloves.

Thanks for the help. I was having a hard time finding that info on the web. The rest I think is doable.
 
Our Furry kids Dr builds restomods or rebuilds classics depending on which direction he feels going with a project, he said to me 1 day at his shop he preferred serious questions about Furry kids done at his office, small talk about the kids was fine at the shop :)
 
Thanks for finding that video Beth. It’s was perfect. A lot of the other videos don’t show the entire assembly, or the axle hub is in the way of the video, or the drum brake assembly is from a later model truck so the springs and other parts are a little different.
But your video is my exact setup and the assembly sequence he takes make the most sense. Great help. Thanks.
I must confess that I found it on OCS. I remembered Tom Mobley had a sticky on drum brakes. Couldn't find it but someone had posted that video (y)
 
Thanks guys. You are exactly correct. There is a little metal hook that goes through a hole in the shoe. View attachment 18583
If you have a large file you can file the edges of those brake shoes to a 45* angle about a 1/16--1/8 wide edge (give or take) That will make initial adjustment of the brake's much easier.
Do it top and bottom and for the drums, unless your drums are out of round don't be worried about the brake drums surface. As long as there's no ridge at the edge of the drum you're good to go.
 
I think I’m gonna get a new proportional valve. The disk brakes on the front were bought off a guy on newspaper classified and includes the front disk/ rear drum prop valve but for some reason the car never stopped well. Master cylinder was new so it’s not that. I also had to lengthen the rod on the back of the power booster so I gotta check that too to make sure I’m getting full travel.
 
Top Bottom