What's new
Old Chevelles

Welcome to OldChevelles.com, built by Auto Enthusiasts for Auto Enthusiasts. Cars are not our only interests so please feel free to post about any subject the community might enjoy or you just feel you need to air.

We respect free speech and constructive dialogue however we don't allow threatening talk against members, nudity, or pornography. Threads are monitored and trolls are not tolerated.

This site is completely free and there are no costs. Please enjoy and provide feedback.
  • We've enabled the website app for anyone who wants to use it on a mobile or desktop device.

  • We've changed the header logo to display our Member's Cars.

    If you'd like your car to show up there, go to the forum Site Bugs & Feature Requests and post your image in the "Member's Car Pictures for the Header Logo" and we'll add your car into the lineup.

What’d you work on today?

Im going to try to post a video of a small squeal I’ve been hearing every now and then but can’t seem to find where it’s coming from other than the belt drive area, well I think I figured how to take a video and post it but I’ll have to try that another day so I’ll add to this later 🙂
They sell spray cans of belt dressing. This will help figure out which one is squealing, then replace the guilty belt (or maybe shim the pulley ?)

1698155899988.png
 
Finally got to make minor progress on the "327".
Shortened eight ARP head studs .400" each on my lathe.

Next I will pocket the same seats in the head .150".
This is needed to fit the Scorpion shaft rockers to the "Vintage" Brownfield heads.
Then I will FINALLY be able to mock up the heads properly so that I may check push-rod length and valve clearance.
I am not running radical lift so not expecting valve issues.
 
Worked on application to put a mini split ac/heat pump in a Fn Garage in Clearwater and you’d think I was going to air condition a Church or something, city beaurocrats (Spell check came up with Beauty Rats! That works for me too 😆
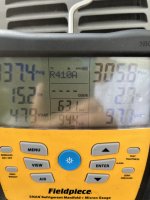
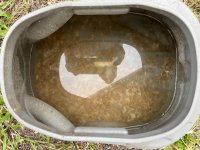
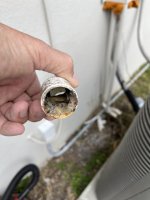
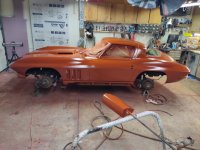
) so now gotta wait for Fn approval to do the job, went to the home we finished a room addition/remodel another contractor started before scamdemic but is gone now to work on the original part of house ac cleaning a clogged drain line, added a T for liquid drain cleaner and RE taped some tape that came loose then went to the garage where the Chevelle is and put the new hood/fender rubber bumpers on but was needed at home so I’ll put the other rubber baby bumpers on later,
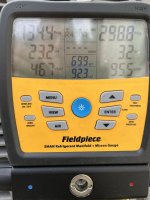
 👍🙂 Oh and added half pound Freon to unit and dropped supply temp 6+*
 

Attachments

  • D7FBF61B-3280-4F2F-B19F-F54659805BBE.jpeg
    D7FBF61B-3280-4F2F-B19F-F54659805BBE.jpeg
    121.4 KB · Views: 9
  • 17E07EED-8DDD-45DC-AA4D-003BCE52A442.jpeg
    17E07EED-8DDD-45DC-AA4D-003BCE52A442.jpeg
    139.6 KB · Views: 5
  • 1DFA47F1-D963-4B7B-8F8F-E631500006E7.jpeg
    1DFA47F1-D963-4B7B-8F8F-E631500006E7.jpeg
    198.1 KB · Views: 4
  • 3C924D88-F928-46BB-8BB0-9BEC94D3747C.jpeg
    3C924D88-F928-46BB-8BB0-9BEC94D3747C.jpeg
    149.8 KB · Views: 4
  • 014DEED4-C5ED-494D-B394-5AB36FC94784.jpeg
    014DEED4-C5ED-494D-B394-5AB36FC94784.jpeg
    127.2 KB · Views: 4
  • 40C94EA9-828D-4685-A3D4-3EC370EF4F54.jpeg
    40C94EA9-828D-4685-A3D4-3EC370EF4F54.jpeg
    280 KB · Views: 5
  • F2E28C24-B0E0-444D-A9C0-3CAC6C5F08CC.jpeg
    F2E28C24-B0E0-444D-A9C0-3CAC6C5F08CC.jpeg
    272.7 KB · Views: 6
  • 0546B1B2-E4FE-4003-AE7F-1D166CF8DF10.jpeg
    0546B1B2-E4FE-4003-AE7F-1D166CF8DF10.jpeg
    95.9 KB · Views: 8
7/16" studs but I had to cut four on each side to a custom length using my lathe.
Here are pics of what all the hoo-rah is about.
Shaft mounts now clear the studs and rockers align nicely with the valves.
Scorpion did the stands custom for these heads.
If I had realized sooner that I could just cut deeper pockets the stands would not have had to be pocketed as well.
I now have enough clearance to be able to torque the heads when ready.
Using plastic shim stock to fake the gasket for now.
 

Attachments

  • IMG_3504.jpeg
    IMG_3504.jpeg
    198.3 KB · Views: 10
  • IMG_3505.jpeg
    IMG_3505.jpeg
    126.9 KB · Views: 14
"Supply chain issues" mean that I could only buy enough hardware to mock up one side of the Larson valve covers.
These really are going to confuse folk when my EC hits the road, these do not look like small-block valve covers.
Lots of room for rockers and with these you can check the valves with the engine running.
Solid lifter cam here so that is a plus.
Only real worry is that some guys have resorted to grinding for brake booster clearance.
But I really hope to ditch the booster for dual MC's and a balance bar.
 

Attachments

  • IMG_3506.jpeg
    IMG_3506.jpeg
    186.3 KB · Views: 11
  • IMG_3507.jpeg
    IMG_3507.jpeg
    205.3 KB · Views: 16
I gotta admit, you played these down and now I can see all your investment in working tech. The valves look to be splayed? Maybe you posted all this, but what size valves, specs on your cam of choice or plans?? Love the valve covers!!
 
I gotta admit, you played these down and now I can see all your investment in working tech. The valves look to be splayed? Maybe you posted all this, but what size valves, specs on your cam of choice or plans?? Love the valve covers!!
Yes, those pics have me intrigued. Sorry if you’ve already discussed but what are the plans for the motor? I’m guess it doesn’t include 8.0 compression and an “Rv cam.”
 
The epoxy I ordered last friday came in early enough today to shoot the base layer before polyester primer. I hope to shoot that tomorrow if my modified prmer gun wants to cooperate. That stuff takes a 2.2 or a bit bigger of a tip to spray wet without thinning.
 

Attachments

  • IMG_20231026_190135.jpg
    IMG_20231026_190135.jpg
    220.5 KB · Views: 12
Damn, that’s gonna be badass!!
I love paint and body stuff. What primer are you using?

For spraying thick stuff I’ve been using a cheap TCP global primer gun. I bought an extra bigger tip too for pretty cheap. I’ve been happy with its performance.
 
SPI epoxy than SlickSand polyester, then SPI epoxy, then high build urethane primer.....then SPI for sealer. My HF primer gun had a 1.8 tip, so I drilled it out to 2.0 ish and it still need more, so tomorrow I'll drill it to 3/32 and see what that gets me.
 
Good stuff. I love slick sand. Sands really nice. I’ve never sprayed a whole car at once, just panels. In my experience it kicks over fast so I’d imagine to spray a whole car you gotta make it up in smaller batches and run thinner through the gun between batches to keep the gun from clogging up. Is your experience similar?
 
I plan on mixing a quart at a time. I've used featherfill before, a bit different....and you're right on flushing the gun between coats or as needed. Narrowing the fan to around 50 or 60 percent helps and is almost mandatory.
 
Installed a 2 indoor head 18K mini split today but need to go back Mon to finish, the owner of Sunshine Optics that I do ac work for bought this house a cpl weeks ago and wanted the garage to have good humidity control for his gun safe, guns & Ammo and any paperwork he might also store, already divided into 3 rooms, 2 offices or store rooms & laundry room, if needed I can have that walkway deemed abandoned if the inspector has a problem lol, this inspector is a problem kinda guy
 

Attachments

  • 610DD70D-071F-4850-80A5-58F82320085D.jpeg
    610DD70D-071F-4850-80A5-58F82320085D.jpeg
    371.3 KB · Views: 5
  • A4DDCBCE-E8DF-4EC6-8000-05F9E006E7CB.jpeg
    A4DDCBCE-E8DF-4EC6-8000-05F9E006E7CB.jpeg
    273.9 KB · Views: 6
  • 333F200D-BFB4-4124-8148-F76E3210F415.jpeg
    333F200D-BFB4-4124-8148-F76E3210F415.jpeg
    73.6 KB · Views: 6
  • 1EA9FB54-D839-4085-B082-65F1E0EB3B20.jpeg
    1EA9FB54-D839-4085-B082-65F1E0EB3B20.jpeg
    98.7 KB · Views: 4
  • 0C908A59-C6BC-466B-9A2F-88EE289CB5A8.jpeg
    0C908A59-C6BC-466B-9A2F-88EE289CB5A8.jpeg
    56.8 KB · Views: 4
I forgot to mention the indoor units are a little off center do to the room with the existing window unit has a window where the lines would’ve went through the wall other room I had to off center to hit studs 👍🙂
 
Top Bottom