What's new
Old Chevelles

Welcome to OldChevelles.com, built by Auto Enthusiasts for Auto Enthusiasts. Cars are not our only interests so please feel free to post about any subject the community might enjoy or you just feel you need to air.

We respect free speech and constructive dialogue however we don't allow threatening talk against members, nudity, or pornography. Threads are monitored and trolls are not tolerated.

This site is completely free and there are no costs. Please enjoy and provide feedback.
  • We've enabled the website app for anyone who wants to use it on a mobile or desktop device.

  • We've changed the header logo to display our Member's Cars.

    If you'd like your car to show up there, go to the forum Site Bugs & Feature Requests and post your image in the "Member's Car Pictures for the Header Logo" and we'll add your car into the lineup.

My 69 project

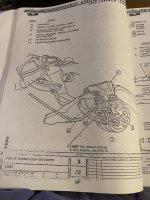
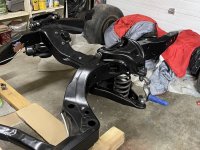
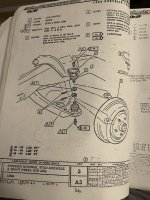
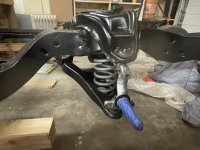
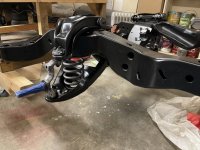
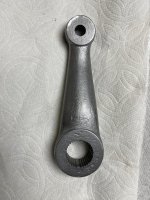
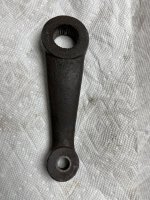
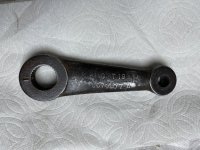
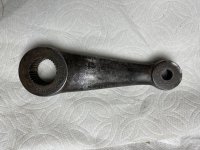
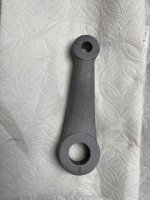
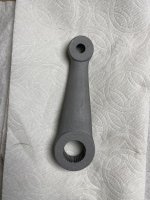
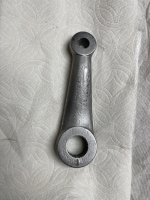
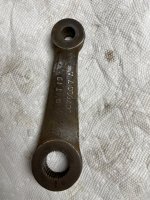
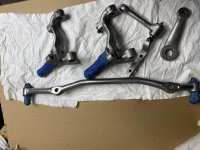
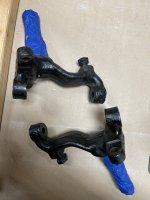
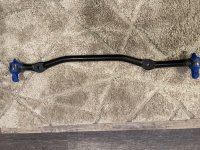
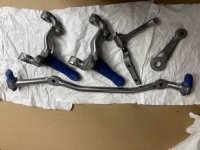
Here is some processes pictures of cleaning the pitman arm.Two Original, simple greened and scrubbed, blasted, wire wheel.
 

Attachments

  • 7CE66216-89E7-43D9-AE53-16FD46CF45B7.jpeg
    7CE66216-89E7-43D9-AE53-16FD46CF45B7.jpeg
    182.1 KB · Views: 6
  • 865C909F-15DF-47C9-930C-D23CA055335A.jpeg
    865C909F-15DF-47C9-930C-D23CA055335A.jpeg
    202.6 KB · Views: 3
  • C567038D-4FF4-4D7B-8408-2B3F0D4FAC78.jpeg
    C567038D-4FF4-4D7B-8408-2B3F0D4FAC78.jpeg
    204.7 KB · Views: 2
  • 24EE61A8-88CF-46D3-9FB3-CB7B253A6DA7.jpeg
    24EE61A8-88CF-46D3-9FB3-CB7B253A6DA7.jpeg
    184.8 KB · Views: 2
  • 3DC52583-EBA9-4AC2-B60D-AF793981135E.jpeg
    3DC52583-EBA9-4AC2-B60D-AF793981135E.jpeg
    176.3 KB · Views: 2
  • E29F2225-7D34-4DB8-9244-286A083B0CEF.jpeg
    E29F2225-7D34-4DB8-9244-286A083B0CEF.jpeg
    185.6 KB · Views: 2
  • 83CD4163-F894-4A4D-8F99-AE0775BA107B.jpeg
    83CD4163-F894-4A4D-8F99-AE0775BA107B.jpeg
    185.5 KB · Views: 1
  • CF910059-76BD-4ECA-9925-61909D38A8FE.jpeg
    CF910059-76BD-4ECA-9925-61909D38A8FE.jpeg
    202.3 KB · Views: 2
These are almost ready for clear. Some before and after pictures. More sanding, polishing, degrease and I want to wipe them down with Gibbs, clear.
 

Attachments

  • FCC29BEB-CC2D-4F2E-A43C-360C0A143A98.jpeg
    FCC29BEB-CC2D-4F2E-A43C-360C0A143A98.jpeg
    204.7 KB · Views: 2
  • 81CDCB3E-B638-463B-8F35-7704F6B1B079.jpeg
    81CDCB3E-B638-463B-8F35-7704F6B1B079.jpeg
    157.8 KB · Views: 2
  • 2C78043F-4295-4A77-B953-D303266E80DE.jpeg
    2C78043F-4295-4A77-B953-D303266E80DE.jpeg
    156.2 KB · Views: 1
  • 2F7C4B2D-761B-47EC-81F6-80222ABA7193.jpeg
    2F7C4B2D-761B-47EC-81F6-80222ABA7193.jpeg
    323.3 KB · Views: 1
  • 2CE117E1-D897-4411-964A-4C977120504C.jpeg
    2CE117E1-D897-4411-964A-4C977120504C.jpeg
    148.7 KB · Views: 3
I really haven’t compared. I just had a spray bottle of simple handy. Does it work better?

I've always used Dawn because it didn't smell, wasn't slimy, and cut the grease really well. I was just curious if you'd made the comparison.

I'm OCD and strong cleaning scents bother me (like stuck in your nose for hours after). I pretty much use Dawn for all my cleaning including in the automatic soap dispenser at my shop sink (even use dawn when I mop my garage floor).
Maybe it’s just me, but I don’t find the smell strong just a unique smell. For that part I just cleaned it in a ziplock bag. There wasn’t a lot there. Mostly I like to do it outside.
 
I was on a thread reading about pitman arm numbers in ocs. I noticed mike said the number for ps was the number I have. Is that correct? Was this part interchangeable from manual and power?
 

Attachments

  • 0C67F590-F64A-455A-8E17-E3C8D7FD5157.jpeg
    0C67F590-F64A-455A-8E17-E3C8D7FD5157.jpeg
    182.1 KB · Views: 2
  • 1B48A60C-DDC4-4E12-874E-2C5E944F1DB3.jpeg
    1B48A60C-DDC4-4E12-874E-2C5E944F1DB3.jpeg
    202.3 KB · Views: 4
I've always used Dawn because it didn't smell, wasn't slimy, and cut the grease really well. I was just curious if you'd made the comparison.

I'm OCD and strong cleaning scents bother me (like stuck in your nose for hours after). I pretty much use Dawn for all my cleaning including in the automatic soap dispenser at my shop sink (even use dawn when I mop my garage floor).
I dump straight purple stuff on my floor, brake cleaner for hard stains. Of course I am Oscar :)

1643831167294.png
 
The one you show (5679207) is for a 68-72 Manual Steering gear with the 13/16 center link hole. The one listed for a P/S is 5679209 still with the 13/16 center link hole. From what I can find, the measured distance of 'center steering gear hole' to the 'center of the center link hole' on both are identical. All the pictures I find look identical. I wonder if the spline count is different.
 
The one you show (5679207) is for a 68-72 Manual Steering gear with the 13/16 center link hole. The one listed for a P/S is 5679209 still with the 13/16 center link hole. From what I can find, the measured distance of 'center steering gear hole' to the 'center of the center link hole' on both are identical. All the pictures I find look identical. I wonder if the spline count is different.
Thanks I see I was off the last number.
 
Could the other one with a different size hole be for a 64-67 Chevelle? I thought the years should be the same size arms but the earlier years have a larger 7/8 hole (vs the 13/16) for the center link pin. Its been years since I looked at these and compared them to to PS / Manual systems.
 
Last night my uncle and I installed the front coil springs. These are the ones I got with the car cleaned and powdered. Spindles were black and purchased off c/l. Install was easy with some help. Used the spring compressor that was internal and hooks on both ends. I could have adjusted the hooks and rod to squeeze the spring tighter, but got it to compress to 14”. Needing an inch or to more. We used a ratchet strap to close the remaining inch we needed to get the castle but on. Easy only I repeat I put the strap on the first one and scratched the paint. I will have to touch that up and sure it won’t be the last. Now I can move on with more of the front steering linkage.
 

Attachments

  • 1B7705F1-F5A5-407B-B1ED-F66023365332.jpeg
    1B7705F1-F5A5-407B-B1ED-F66023365332.jpeg
    161.2 KB · Views: 4
  • 0D3526FD-237E-4CF2-98E0-FDD9B32514AC.jpeg
    0D3526FD-237E-4CF2-98E0-FDD9B32514AC.jpeg
    182.8 KB · Views: 4
  • 7F0B5716-5F91-4431-B57A-6CED750CCB94.jpeg
    7F0B5716-5F91-4431-B57A-6CED750CCB94.jpeg
    188 KB · Views: 3
  • E79B8E6D-8403-44EE-AB04-B3AD137E32A4.jpeg
    E79B8E6D-8403-44EE-AB04-B3AD137E32A4.jpeg
    135 KB · Views: 3
  • 46969657-02E5-488D-B24F-7706F9E53ADF.jpeg
    46969657-02E5-488D-B24F-7706F9E53ADF.jpeg
    171.2 KB · Views: 3
Nice. Such a rewarding point in a restoration. I use a 1/2" threaded rod through the shock holes to compress the spring. Use a thread coupler instead of a nut, so as not to strip the threads in repeated use. Impact ratchet is key here also.
 
Nice. Such a rewarding point in a restoration. I use a 1/2" threaded rod through the shock holes to compress the spring. Use a thread coupler instead of a nut, so as not to strip the threads in repeated use. Impact ratchet is key here also.
Good old fashion socket and man power. Glad I don’t have to do it like that again. I still have the backs to install, but that shouldn’t be as hard or take as long.
 
Top Bottom