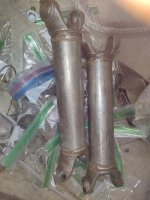
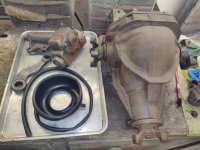
dropped off the frame this morning, the new blaster I found is stellar!!, he worked with me on timing, got it done, hit all the hard to reach areas, and shrink wrapped it and I picked it up 5 hrs later. Cleaned some other stuff in the down time. The steering box I've got to gut and inspect....it has a bit of notchyness in the movement. 3rd member will be torn apart, resealed and bearings checked. I'll likely go through the posi, r&p look perfect. I'm going to use evaporust on a lot of these cast parts and wax coat them and reinstall, it's just the right thing to do to 60 yr old parts.
Old Chevelles
Welcome to OldChevelles.com, built by Auto Enthusiasts for Auto Enthusiasts. Cars are not our only interests so please feel free to post about any subject the community might enjoy or you just feel you need to air.
We respect free speech and constructive dialogue however we don't allow threatening talk against members, nudity, or pornography. Threads are monitored and trolls are not tolerated.
This site is completely free and there are no costs. Please enjoy and provide feedback.You are using an out of date browser. It may not display this or other websites correctly.
You should upgrade or use an alternative browser.
You should upgrade or use an alternative browser.
What’d you work on today?
- Thread starter JohnC
- Start date
Richard150MPH
Veteran Member
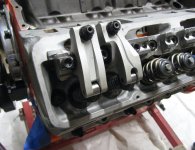
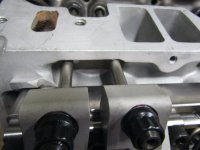
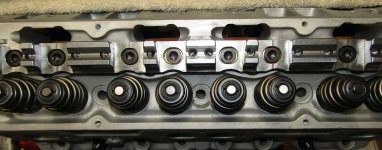
Tried to mock up the 327 valve-train.
Pushrods do not clear the head!
Only practical fix I can see is either thinner pushrods (Nope) or clearance the head.
That will leave me with a pretty thin rail for sealing.
This is with the tops of the push rods not even seating properly.
I have a vertical mill so this is not hard to do, but not anything I want to have to do.
The obvious fix is to do the rockers over with the ball nearer the center of the head.
Scorpion had lent me a set of rocker to try and they seemed fine.
But I did not get to try them on a block and cam.
Really doubt Scorpion wants to gift me another set.
Attachments
Last edited:
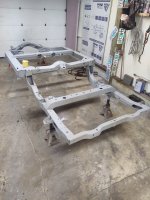
Performed sacrilege on the vette frame, but it's almost mandatory when installing a TKX tranny, or imo any manual trans as you can't remove the tranny without pulling the engine. That includes any clutch maintenance or replacement. Anyway, it's roughed in, next i'll clean, sand the entire frame bottom side with 220, then flip it and do the topside. Then do a couple minor popouts of jack dents, and epoxy. Fun, fun.
Attachments

They didn't install that from the factory because the bean counters wouldn't allow the extra $$.Performed sacrilege on the vette frame, but it's almost mandatory when installing a TKX tranny, or imo any manual trans as you can't remove the tranny without pulling the engine. That includes any clutch maintenance or replacement. Anyway, it's roughed in, next i'll clean, sand the entire frame bottom side with 220, then flip it and do the topside. Then do a couple minor popouts of jack dents, and epoxy. Fun, fun.
That looks great.
kmakar
Janitor
Performed sacrilege on the vette frame, but it's almost mandatory when installing a TKX tranny, or imo any manual trans as you can't remove the tranny without pulling the engine. That includes any clutch maintenance or replacement. Anyway, it's roughed in, next i'll clean, sand the entire frame bottom side with 220, then flip it and do the topside. Then do a couple minor popouts of jack dents, and epoxy. Fun, fun.
Nice job.
It's on the bottom of the member and there's a 3/4 inch hole on the topside. it'll take some beating and filler work. There's a couple small impressions to fix on the bottom of the rails.Looks like it’ll be plenty strong.
How do you pop out a dent in the frame?
How much clearance on the other side of PR’s? Does Scorpion offer a shaft rocker with a shorter distance between roller tip & PR seat?Tried to mock up the 327 valve-train.
Pushrods do not clear the head!
Only practical fix I can see is either thinner pushrods (Nope) or clearance the head.
That will leave me with a pretty thin rail for sealing.
This is with the tops of the push rods not even seating properly.
I have a vertical mill so this is not hard to do, but not anything I want to have to do.
The obvious fix is to do the rockers over with the ball nearer the center of the head.
Scorpion had lent me a set of rocker to try and they seemed fine.
But I did not get to try them on a block and cam. View attachment 17638
Really doubt Scorpion wants to gift me another set.
Richard150MPH
Veteran Member
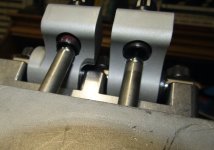
I have modified the Brownfield heads for more pushrod clearance.
I will have to check every set but so far it looks like I will have enough room.
Space it tighter when the lifter is at the top of the cam lobe.
I may have to get creative to get a good seal with the narrow perimeter rails.
I bought these heads a long time ago for "A great price" and now kind of wish I had never seen them.
I have a silly amount of money into them and these custom shaft rockers.
Throwing in more money is easier to do when you can take your time, but nowadays I feel like I am out of time and very anxious to FINISH this build.
Setting up the mill and finding tooling took as long as the actual work.
I was lucky to have an extended three-flute 3/8" end mill on hand.
Plunge cuts worked fine.
I know, worthless without pics.
Attachments

Are VC's going to clear PR's & fit ?I have modified the Brownfield heads for more pushrod clearance.
I will have to check every set but so far it looks like I will have enough room.
Space it tighter when the lifter is at the top of the cam lobe.
I may have to get creative to get a good seal with the narrow perimeter rails.
I bought these heads a long time ago for "A great price" and now kind of wish I had never seen them.
I have a silly amount of money into them and these custom shaft rockers.
Throwing in more money is easier to do when you can take your time, but nowadays I feel like I am out of time and very anxious to FINISH this build.
Setting up the mill and finding tooling took as long as the actual work.
I was lucky to have an extended three-flute 3/8" end mill on hand.
Plunge cuts worked fine.
I know, worthless without pics.
Richard150MPH
Veteran Member
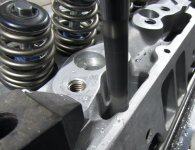
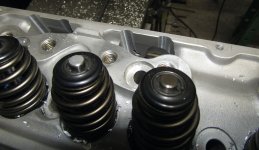
I may have to notch the VC rails too.
The Larson covers will clear the roller rockers.
Trick is going to be coming up with a clean and effective gasket.
The Larson covers will clear the roller rockers.
Trick is going to be coming up with a clean and effective gasket.
I made this unfinished L shaped trunk line for one of my friends Gfriend, hes co owner of the Upholstery shop I know now waiting for a handyman to finish some repairs then haul these over there and finish putting it all together, this will be installed tight to the hall ceiling and new soffit built, old soffit duct was a leaking mess, I might swap for custom upholstery on the 2012 Camaro bucket seats and match the rear seat since I really don’t care for the look of the back seat that my other friend also co owner of same shop did
Attachments
Chevelle_Nut
Shop Foreman
Didn't do much, had to visit the parents today. I repaired a bad ground in the taillight of the golf cart and added water to its batteries.
Parents Mercedes had a CEL on, read the code and cleared it.
Parents Mercedes had a CEL on, read the code and cleared it.
kmakar
Janitor
Put new front tires (3 rib 6.00 x 16) and tubes on the MF tractor. Rims are in tough shape where the valve stem sticks out, so I had the guy cut pieces of inner tube from the old set and used them to buffer between the valve stem and the rim. Then I pulled some dirt with the box blade to build up 1.5' near the front door to grade it.
Chevelle_Nut
Shop Foreman
Red Fusion got and oil change and transmission service. The old Cub Cadet got an oil change and I repaired its headlights.
Camper is going in for some sidewall repairs tomorrow, been getting it ready to be away from home for a few weeks. Excursion is also being dropped off at the dealer after the camper is dropped to follow up on a couple of remaining punch list items.
Camper is going in for some sidewall repairs tomorrow, been getting it ready to be away from home for a few weeks. Excursion is also being dropped off at the dealer after the camper is dropped to follow up on a couple of remaining punch list items.
You should be able to suck that right in with a simple striker adj. Make sure you're on the second latch, there's two. Close it slow, feel the first click, then push to catch the second. If you can't get it, move the striker out, if you get it and the door still isn't closed, adjust in the amount of your gap. I like to cut a clear plastic thin washer to use as a paint protector as Chevy did, but most are never reused.
Alwhite00
Well-Known Member
Hopefully not Soffseal.What brand weatherstripping?